Tuesday, July 7, 2009

Looking at Alfresco Share 3.2 Community - Part 3 - Customizing forms

This blog will look at how to display custom types and aspects in Share in the edit metadata feature. The previous blog article showed how to associate content with predefined aspects and show them in the edit metadata form.

This example requires Alfresco 3.2 Labs (currently Preview).

Resources:
* Alfresco forms engine wiki page
* Alfresco forms engine examples wiki page

Also see my previous blog entries showing how forms are used in Alfresco Share 3.2

I will use the example project structure offered by Jeff Potts' great article - Extending the Alfresco Content model to extend the content model in Alfresco. For the share customization, I will base my project on the Share extension project example in my blog.

Creating the new Custom content type

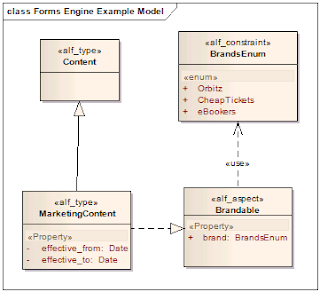
For this example, I will create a custom content type and modify the edit metadata form shown in Alfresco Share. The content type I will create will center around a custom type called MarketingContent, with an additional Aspect called Brandable. This custom metadata will add the ability to identify the 'brand' to which the Marketing content should be associated, and will require a custom single-select drop down.
Step 1 - Setup the project to extend Alfresco with custom content

1. Download Jeff Potts' custom content example source
2. Import into Eclipse - assume you already downloaded the Alfresco SDK and imported SDK AlfrescoRemote
3. Fix project references as needed
4. Update build.properties for ant build (alfresco.sdk.remote.home and alfresco.web.root)

Step 2 - Modify project for new custom content model

Four files to modify:
* PROJECT_HOME/src/alfresco/extension/someco-model-content.xml
* PROJECT_HOME/src/alfresco/extension/scModel.xml
* PROJECT_HOME/src/alfresco/extension/web-client-config-custom.xml
* PROJECT_HOME/src/alfresco/extension/webclient.properties

someco-model-content.xml (renamed to 'orbitz-model-content.xml')
<?xml version='1.0' encoding='UTF-8'?>
<!DOCTYPE beans PUBLIC '-//SPRING//DTD BEAN//EN' 'http://www.springframework.org/dtd/spring-beans.dtd'>

<beans>
<!-- Registration of new models -->
<bean id="extension.dictionaryBootstrap" parent="dictionaryModelBootstrap" depends-on="dictionaryBootstrap">
<property name="models">
<list>
<value>alfresco/extension/orbModel.xml</value>
</list>
</property>
</bean>
</beans>

scModel.xml (renamed to 'orbModel.xml')
<?xml version="1.0" encoding="UTF-8"?>
<!-- Definition of new Model -->
<model name="orb:orbitzmodel" xmlns="http://www.alfresco.org/model/dictionary/1.0">

<!-- Optional meta-data about the model -->
<description>Orbitz Marketing Model</description>
<author>Ed Wentworth</author>
<version>1.0</version>

<!-- Imports are required to allow references to definitions in other models -->
<imports>
<!-- Import Alfresco Dictionary Definitions -->
<import uri="http://www.alfresco.org/model/dictionary/1.0" prefix="d" />
<!-- Import Alfresco Content Domain Model Definitions -->
<import uri="http://www.alfresco.org/model/content/1.0" prefix="cm" />
</imports>

<!-- Introduction of new namespaces defined by this model -->
<namespaces>
<namespace uri="http://www.orbitz.com/model/content/1.0" prefix="orb" />
</namespaces>
<constraints>
<constraint name="orb:brands" type="LIST">
<parameter name="allowedValues">
<list>
<value>Orbitz</value>
<value>CheapTickets</value>
<value>eBookers</value>
</list>
</parameter>
<parameter name="caseSensitive"><value>true</value></parameter>
</constraint>
</constraints>

<types>
<!-- Enterprise-wide generic document type -->
<type name="orb:doc">
<title>Orbitz Document</title>
<parent>cm:content</parent>
<mandatory-aspects>
<aspect>cm:generalclassifiable</aspect>
</mandatory-aspects>
</type>

<type name="orb:marketing_content">
<title>Orbitz Marketing Content</title>
<parent>orb:doc</parent>
<properties>
<property name="orb:effective_from">
<type>d:date</type>
</property>
<property name="orb:effective_to">
<type>d:date</type>
</property>
</properties>
</type>
</types>

<aspects>
<aspect name="orb:brandable">
<title>Orbitz Brandable</title>
<properties>
<property name="orb:brand">
<type>d:text</type>
<mandatory>true</mandatory>
<constraints>
<constraint ref="orb:brands"/>
</constraints>
</property>
</properties>
</aspect>

</aspects>
</model>

web-client-config-custom.xml
<alfresco-config>

<!-- add webable aspect properties to property sheet -->
<config evaluator="aspect-name" condition="orb:brandable">
<property-sheet>
<show-property name="orb:brand" display-label-id="brand" />
</property-sheet>
</config>

<!-- show related documents association on doc property sheet -->
<config evaluator="node-type" condition="orb:doc">
<property-sheet>
</property-sheet>
</config>

<!-- show related documents association on whitepaper property sheet -->
<config evaluator="node-type" condition="orb:marketing_content">
<property-sheet>
<show-property name="orb:effective_from" display-label-id="effective_from" />
<show-property name="orb:effective_to" display-label-id="effective_to" />
</property-sheet>
</config>

<!-- add orbitz types to add content list -->
<config evaluator="string-compare" condition="Content Wizards">
<content-types>
<type name="orb:doc" />
<type name="orb:marketing_content" />
</content-types>
</config>

<config evaluator="string-compare" condition="Action Wizards">
<!-- The list of aspects to show in the add/remove features action -->
<!-- and the has-aspect condition -->
<aspects>
<aspect name="orb:brandable"/>
</aspects>

<!-- The list of types shown in the is-subtype condition -->
<subtypes>
<type name="orb:doc" />
<type name="orb:marketing_content" />
</subtypes>

<!-- The list of content and/or folder types shown in the specialise-type action -->
<specialise-types>
<type name="orb:doc" />
<type name="orb:marketing_content" />
</specialise-types>
</config>

<config evaluator="string-compare" condition="Advanced Search">
<advanced-search>
<content-types>
<type name="orb:doc" />
<type name="orb:marketing_content" />
</content-types>
<custom-properties>
<meta-data aspect="orb:brandable" property="orb:brand" display-label-id="brand" />
</custom-properties>
</advanced-search>
</config>
</alfresco-config>

webclient.properties
#orb:marketing_content
effective_from=Effective From
effective_to=Effective To

#orb:brandable
brand=Brand


Step 3 - Deploy

Make sure that build.properties is properly configured

  1. Run ant deploy

Step 4 - Test Model
As a prerequisite, you should go to Share client and create a new site (i.e. 'Merchandising')
  1. In Alfresco Explorer client - Upload content as type 'Marketing Content'
  2. Apply 'Brandable' aspect
  3. Modify content propertis -- should look like picture below
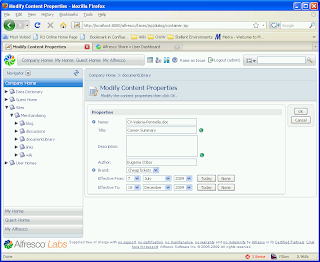


In order for this form to render, we need to modify the forms configuration to let Share know how to render our custom type and aspect. For details on this, see the forms wiki and forms examples wiki pages.

Step 5: Configure share to render the orb:market_content type and orb:brandable aspect

Create a file named 'web-framework-config-custom.xml' and deploy it to the share/WEB-INF/classes/alfresco/web-extension directory with the contents:
<alfresco-config>

<config evaluator="node-type" condition="orb:marketing_content">
<forms>
<form>
<field-visibility>
<!-- inherited from cm:content -->
<show id="cm:name" />
<show id="cm:title" force="true" />
<show id="cm:description" force="true" />
<show id="mimetype" />
<show id="cm:author" force="true" />
<show id="size" for-mode="view" />
<show id="cm:creator" for-mode="view" />
<show id="cm:created" for-mode="view" />
<show id="cm:modifier" for-mode="view" />
<show id="cm:modified" for-mode="view" />

<!-- specific for orb:marketing_content -->
<show id="orb:effective_from" />
<show id="orb:effective_to" />

<!-- aspect orb:brandable -->
<show id="orb:brand" />

</field-visibility>
<appearance>
<field id="orb:effective_from" label="Effective From"/>
<field id="orb:effective_to" label="Effective To"/>
<field id="orb:brand" label="Brand">
<control template="controls/selectone.ftl">
<control-param name="options">Orbitz,CheapTickets,eBookers</control-param>
</control>
</field>
</appearance>
</form>
</forms>
</config>
</alfresco-config>


As we see here, we needed to copy all of the default properties from cm:content as well as add our unique properties for orb:marketing_content, and add the orb:brands aspect. This gives us very fine-grained control, but we can see there could be a lot of repeated configurations if we use types with aspects in complex ways.

Step 5: Run the example

Now we can go ahead and restart share and log in and select 'edit metadata' of our content previously checked in with the type orb:marketing_content and set with the orb:brandable aspect.

Now we should see the following:
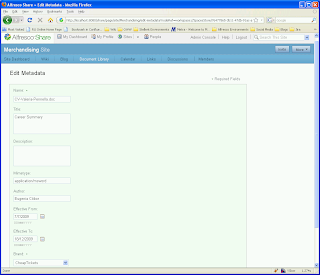


We customized the selectone.ftl control template to provide our list of brands. One can consider an extension to this control would be to look up this list from a data web-script.

We should create our own selectone lookup from an external source in an ajax way. We will do so in a further blog article.
Tuesday, June 30, 2009

Looking at Alfresco Share 3.2 Community - Part 2 - Edit Custom Metadata

This series of blog entries is intended to walk through the new features of Alfresco Share 3.2 Labs. In the previous blog entry, I built the community version from source, and looked at the new Admin Console feature. This blog, I will look at how Share exposes Custom metadata, and allows users to assign aspects to uploaded content.

Viewing and Editing Custom Metadata
I have Alfresco 3.2 Labs running on my Windows XP Laptop, built from source updated June 23, 2009, and I have deployed both Alfrsco.war and share.war to an instance of Tomcat 6.
In previous versions of Share, it wasn't possible to view or edit custom metadata. Share 3.2 Labs addresses this deficit. Further, it leverages Surf's new forms architecture to render the metadata form dynamically. We will look at this in detail later. First, I will walk through the user interface for metadata.

In order to show Share's ability to view custom metadata, we need to create a new Site and Upload some content. Here are the steps briefly:
  1. Log into Share (as admin/admin) --> The User Dashboard renders with the 'My Sites' dashlet.
  2. Click on 'Create Site' in the My Sites dashlet (or select 'create site' from the 'Sites' drop down in the top menu) --> The Create Site popup will render.
  3. Enter the Name, URL name, and Description (optional) of this new site. (In my example I created a site with Name=Merchandising, URL name=Merchandising).
  4. Press 'Ok' when complete and the new site will be created, returning you to the user dashboard.
  5. Select the new site from the 'My Sites' dashlet, or the top menu's Sites dropdown --> the Site dashboard will render.
  6. Navigate to the 'Document Library' page to upload new content --> the Document Library page renders.
  7. Click on 'Upload' button to upload some content to the default documents folder.
Now that we have content, we should be able to view the metadata.

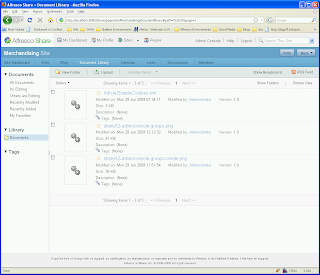
Here I am looking at Document Library in the merchandising site, where have uploaded an XML file and a couple of image files...


Hovering over one of the files in the list renders the actions that can be performed on that file.
Actions include:
  • Download
  • Edit Metadata
  • Upload new Version
  • More > (we will look at some of these later)

This list of actions is very configurable. We may show how to do this in a later blog.
The 'Edit Metadata' action is what we want. Select the 'Edit Metadata' action for the uploaded document.

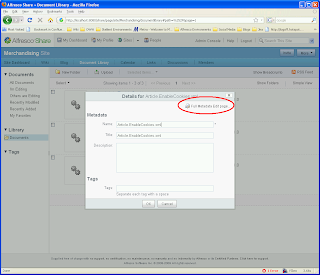
Here I selected edit metadata for an XML ddocument named 'Article.EnableCookies.xml'...


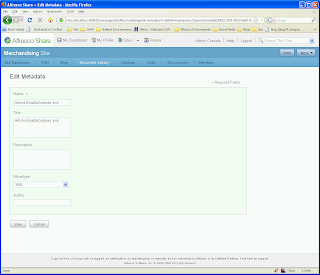
This looks pretty normal. It is the same popup as with previous version of Share allowing edit of basic metadata properties like Name, Title, Description and tags. But notice in the Upper right corner 'Full metadata Edit page...'. Selecting this will render a full screen rendering all of the document's metadata.

Here I am showing the full metadata page of the xml file I uploaded...


In this example, two new fields are rendered: the Mimetype, and the Author.

This full page renders the metadata form in 'Edit' mode using the new forms engine. The form is rendered by obtaining a form configuration from the remote alfresco repository. This form configuration is dynamically generated from the available metadata on the content item being viewed. The form archtiecture is capable of rendering the following types of controls (see more detail in the forms service wiki:
  • mimetype -- <select> <option> from a list of mime types (i.e. application/pdf, ...)
  • size -- display file size
  • textarea -- <textarea> field configurable to r rows and c columns
  • slectone -- <select> field with <option> tags dynamically rendered
  • textfiled -- <input type="text"> field
  • category -- picker selecting one or more categories to associate with the content
  • endocding -- <select> field to choose <option> from list of encoding types (i.e. UTF-8, ISO-8859-1, ...)
  • association -- picker selecting one or more other content items to associate this content item too
  • checkbox -- <input type="checkbox"> field
  • readonly -- <input type="text"> rendered as read only
  • date -- renders a date picker setting value to an <input type="text"> field
  • period -- selecting x days, weeks, etc.
Associating Aspects

To really show the custom metadata feature, we will look at another great feature added to Share 3.2, the ability to associate new aspects to documents. When we associate a new aspect, new properties can be added to the document and the edit metadata full form should reflect those changes. To do this, let us add the 'dublin core' aspect to the document we just looked at.
  1. Hover over the document --> the actions should render
  2. Select the 'more' option --> the more options should render
  3. Select the 'manage aspects' option --> the manage aspects popup will render
  4. Select the '+' by the 'Dublin Core' aspect in the 'Available to Add' list --> The 'Dublin core' should be removed from the 'Available to Add' and added to the 'Currently Selected' list
  5. Select the 'Apply changes' button to save the changes
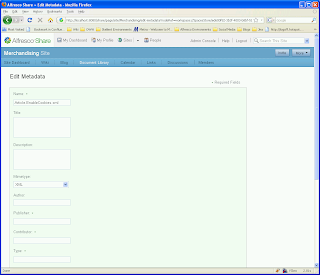
Now we can look at the edit metadata again and see the new metadata properties added via the Dublin Core aspect

Here we see the edit metadata full page with the dublin core properties


The next blog entry will look at customizing share to display our own content types and aspects.

Friday, June 26, 2009

Looking at Alfresco Share 3.2 Community

Building Alfresco Labs 3.2 from Community

This blog and others to follow will walk through the new features of Alfresco Share 3.2 Labs. First, I will walk through some of the key features. Then I will open up the box and look in side at a few choice features. Finally, I will show examples of the extensibility of this new version of Share.

Building from source was fairly straight forward. I use Tortoise SVN as my svn client (on my Windows XP laptop). I 'updated' to the latest code (as of 23 June 09). I used ant to build, with my environment setup as recommended in the Alfresco SVN Development environment wiki.

When attempting to deploy to tomcat using 'ant build-tomcat' and 'ant incremental-tomcat', the ant task complained that I needed to use tomcat 6. I downloaded Apache tomcat 6.0.20. I noticed that tomcat 6 doesn't create a 'shared' folder by default, which is used by alfresco for extension. But I found a wiki page for configuring tomcat 6 that explains how to configure tomcat 6 for this purpose.

Because I have multiple versions of alfresco on this machine, I didn't want to sacrifice the default db (mysql database named alfresco). I had problems with configuring other db vendor, however. I followed the configuring db wiki page for 3.2 and tried boty Derby and HSQL as alternatives. However, various problems occurred. HSQL and Derby didn't seem to have corrected hibernate mappings and/or sql build scripts. So I chose to create another db instance on mysql named alfresco2. I'm sure with a little more patience, I would have succeeded. But I'm impatient.

In order to configure to this new db (and as described on the database configuration wiki page), I found that there is now a file 'alfresco-global.properties' that you can copy from your TOMCAT_HOME/webapps/alfresco/WEB-INF/classes directory (named 'alfresco-global.properties.sample') to TOMCAT_HOME/shared/classes directory, renamed to 'alfresc-global.properties'. I noted that this did NOT go into an 'alfresco/extensions' subdirectory as in the past with 'custom-repository.properties'.

Starting up tomcat on my windows xp with the default configurations caused a problem with out of heap space and, later PermGen. I changed the startup parameters to add more heap and PermGen (-Xms256M -Xmx512M -XX:MaxPermSize=256m) and finally I was in business.

First Impressions of Share 3.2


After logging in to share (i.e. http://localhost:8080/share) with the default user account admin/admin, the admin user dashboard is rendered first. Nothing new here. However in the header, right justified I saw a 'Admin Console' button. Clicking it, I see you can now create new users and groups from Share directly!

Here I logged in as admin/admin...


Admin Console

It seems there is a new role for Share users, that of 'Manager'. This role is described in the forums. The 'Manager' role has permisions to expose the new 'admin console.'

The Admin Console is accesssed by clicking the 'Admin Console' button on the top menu. This console is configured with an extensible list of console 'tools'. The console opens up showing the first tool: Groups.

Groups Tool

Here, I clicked on the 'Admin Console' button...


The 'Groups' tool allows a user to drill down through the hierarchy of groups, and create new groups, edit them and remove them. To represent the hierarchy, the user interface represents levels of groups by showing child groups in a new list panel created to the right of the group list panel with the selected group. The successive levels of group lists all have similar functionality (recursively rendered) to add, edit and remove groups and their children. This UI approach is a bit odd, but effective.

Clicking 'new group' opens the 'Create Group' form, prompting the user to enter the required fields for: Identifier and Display name. Once entered, the buttons 'Create Group', 'Create and Create Another' are enabled. The 'Create Group' creates a group with the given Identifier and Display name, and returns back to the 'Groups' tool main page. The 'Create and Create Another' creates a group as the 'Create Group' button but clears the form to enter another group. The labels of these buttons might be a bit confusing at first.

Here I clicked the 'New group' button ...


I tried creating a new group and the group called 'testg', but it wasn't added to the list immediately. Reopening the admin console later, I saw the group I created listed correctly (see https://issues.alfresco.com/jira/browse/ALFCOM-3110).

In the Groups tool of the Admin Console, hovering over an item indicates other actions that can be performed on that item, including 'edit' and 'delete'.

Users tool

The users tool of the 'Admin Console' allows the manager to create new users and edit users. The search box requires at least one character entered before search works. (Perhaps adding a note on this screen or disabling/enabling the 'search' button might help.) This search text seems to be a partial match to find anything with the text entered 'in' the user's name.

Here I typed 'a' and pressed 'Search'...


A new user can be created from the users tool main page by clicking the 'New User' button upper right, or an existing user details can be viewed, and later edited, by clicking on the user name in the list.

Here I clicked on the 'Jane Smith' name in the users list...

From the user profile view page there are two buttons: Edit User and Delete User. From the Edit User page, you can enter basic information, assign the user to groups, set a quota, change passwords and select photos.

Next blog entry -- look at edit metadata feature.

Tuesday, May 12, 2009

Alfresco Regional Meetup

On Wednesday April 29, 2009, The Chicago area hosted a regional alfresco meetup where I was in attendance. There were a few Alfrewsco speakers and a few community speakers. Among the speakers were Jeff Potts talking about Drupal integration, and Michael Uzquiano talking about WCM roadmap and Share. Also, Yong Qu presented a bit on integration to email clients.

I also presented some of our work on Alfresco Share developing a custom contribution client for our marketing content. For those interested, my PowerPoint presentation is located here.

Tuesday, April 7, 2009

Working with jBPM workflows in Alfresco - Part 3 : Alfresco scripts

In the previous blog entry: Working with jBPM Workflows in Alfresco - Part 1 : jBPM, we saw how to create a simple jBPM workflow and test it.

In a blog entry before that: Working with jBPM Workflows in Alfresco - Part 2 : Embedded Alf - SDK, we saw how to run our workflow in Alfresco Embedded using the SDK.

In this blog entry, we will add some Alfresco scripts into our workflow that make use of Alfresco APIs.

Step 1 - Logging in JavaScript via Alfresco logger

Starting simple, lets modify our process definition to print out a log message every time we transition to a new state. This is a handy technique if we're not sure our logic is going the way we think it should. Here is the updated processs definiton:
<?xml version="1.0" encoding="UTF-8"?>

<process-definition xmlns="urn:jbpm.org:jpdl-3.2" name="publishContentBasic">
<start-state name="start">
<transition name="to_requested" to="requested">
<action class="org.alfresco.repo.workflow.jbpm.AlfrescoJavaScript">
<script>
logger.log("Going to requested state");
</script>
</action>
</transition>
</start-state>

<state name="requested">
<transition to="processing" name="to_processing">
<action class="org.alfresco.repo.workflow.jbpm.AlfrescoJavaScript">
<script>
logger.log("Going to processing state");
</script>
</action>
</transition>
</state>

<state name="processing">
<transition to="succeeded" name="to_succeeded">
<action class="org.alfresco.repo.workflow.jbpm.AlfrescoJavaScript">
<script>
logger.log("Going to succeeded state");
</script>
</action>
</transition>
<transition to="failed" name="to_failed">
<action class="org.alfresco.repo.workflow.jbpm.AlfrescoJavaScript">
<script>
logger.log("Going to failed state");
</script>
</action>
</transition>
</state>

<state name="succeeded">
<transition to="end" name="to_end">
<action class="org.alfresco.repo.workflow.jbpm.AlfrescoJavaScript">
<script>
logger.log("Going to end state");
</script>
</action>
</transition>
</state>

<state name="failed">
<transition to="end" name="to_end">
<action class="org.alfresco.repo.workflow.jbpm.AlfrescoJavaScript">
<script>
logger.log("Finishing");
</script>
</action>
</transition>
</state>

<end-state name="end"></end-state>
</process-definition>
Here we see the new process containing an action element in the transition element calling out the org.alfresco.repo.workflow.jbpm.AlfrescoJavaScript class. This class provides a java script environment with the Alfresco JavaScript API default objects instantiated and ready to use. One of which is the logger.
This action wraps a <script> element containing the javascript to run.

To view the results, first change the log4j.properties config to show the javascipt log messages (and reduce some of the noise).
# Set root logger level to DEBUG and its only appender to CONSOLE.
log4j.rootLogger=WARN, CONSOLE

# CONSOLE
log4j.appender.CONSOLE=org.apache.log4j.ConsoleAppender
log4j.appender.CONSOLE.layout=org.apache.log4j.PatternLayout
log4j.appender.CONSOLE.layout.ConversionPattern=%d{HH:mm:ss,SSS} [%t] %-5p %C{1} : %m%n

# LIMIT CATEGORIES
log4j.logger.org.jbpm=INFO
#log4j.logger.org.jbpm.graph=DEBUG
log4j.logger.com.sample=DEBUG
# Hibernate debugging levels and their output
log4j.logger.org.hibernate=WARN
#Log all SQL DML statements as they are executed
#log4j.logger.org.hibernate.SQL=TRACE
#Log all JDBC parameters
#log4j.logger.org.hibernate.type=TRACE
#Log all SQL DDL statements as they are executed
#log4j.logger.org.hibernate.tool.hbm2ddl=DEBUG
#Log the state of all entities (max 20 entities) associated with the session at flush time
#log4j.logger.org.hibernate.pretty=DEBUG
#Log all second-level cache activity
#log4j.logger.org.hibernate.cache=DEBUG
#Log transaction related activity
#log4j.logger.org.hibernate.transaction=DEBUG
#Log all JDBC resource acquisition
#log4j.logger.org.hibernate.jdbc=TRACE
#Log HQL and SQL ASTs and other information about query parsing
#log4j.logger.org.hibernate.hql.ast=DEBUG
#Log all JAAS authorization requests
#log4j.logger.org.hibernate.secure=DEBUG
#Log everything (a lot of information, but very useful for troubleshooting)
#log4j.logger.org.hibernate=DEBUG
#log4j.logger.org.hibernate.tools=DEBUG

log4j.logger.org.alfresco=INFO

log4j.logger.org.alfresco.repo.jscript=DEBUG


The last line: log4j.logger.org.alfresco.repo.jscript=DEBUG does the trick. Now run the PublishContentBasicProcessAlfTest as a JUnit test and see the results. You should get something like the following in the log:
20:42:22,574 [main] DEBUG ScriptResourceHelper : Imports resolved, adding resource '_root
20:42:22,761 [main] DEBUG ScriptLogger : Going to requested state
20:42:22,765 [main] DEBUG RhinoScriptProcessor : Time to execute script: 189ms
20:42:22,893 [main] DEBUG ScriptResourceHelper : Imports resolved, adding resource '_root
20:42:22,899 [main] DEBUG ScriptLogger : Going to processing state
20:42:22,901 [main] DEBUG RhinoScriptProcessor : Time to execute script: 6ms
20:42:22,936 [main] DEBUG ScriptResourceHelper : Imports resolved, adding resource '_root
20:42:22,942 [main] DEBUG ScriptLogger : Going to succeeded state
20:42:22,943 [main] DEBUG RhinoScriptProcessor : Time to execute script: 5ms
20:42:23,004 [main] DEBUG ScriptResourceHelper : Imports resolved, adding resource '_root
20:42:23,010 [main] DEBUG ScriptLogger : Going to end state
20:42:23,011 [main] DEBUG RhinoScriptProcessor : Time to execute script: 5ms

Lets do something more interesting. Supposing we wanted to create and/or update some content. The Alfresco JavaScipt API cookbook has an interesting example which I will steal for this purpose. Add the following javascript to the script element of the 'to_requested' transition:
<script>
logger.log("Going to requested state");
logger.log("trying to create file and make it versionable");

var doc = userhome.createFile("checkmeout.txt");
doc.addAspect("cm:versionable");
doc.content = "original text";
logger.log("created versionable doc with content '"+doc.content+"'");

var workingCopy = doc.checkout();
workingCopy.content = "updated text 1";

doc = workingCopy.checkin();

workingCopy = doc.checkout();
workingCopy.content = "updated text 2";

doc = workingCopy.checkin("a history note", true);
logger.log("checked doc out and in a couple of times");
</script>


In this example, we create a new item of content with some text and make it versionable. Then we check it out and updated it. And again checkout and update it, and on check in we use a comment.

Note: be careful as to what syntax you use in the script element. Since this appears in XML, we must escape any characters that can cause this script body to parse incorrectly (such as < and > characters). I had to remove the // comment lines to make this work correctly.

Step 2 - Running a Java class with Alfresco

Now we will configure to run alfresco java foundation API services.

END

Working with jBPM workflows in Alfresco - Part 2: Embedded Alf - SDK

This part focuses on extending the previous blog post: Working with Workflows in Alfresco - Part 1: jBPM to run as an Embedded Alf SDK project, and to configure and use Alfresco scripts as actions in the workflows.

Step 1 - Install SDK
Make sure you install the SDK according to the documentation on the Alfresco Wiki
Import the SDK projects into the same workspace you are using for this tutorial

Step 2 - Configure Project to Run with Embedded Alfresco
  1. Go to project properties > Java buid path > Projects tab and select 'add' to add SDK AlfrescoEmbedded
  2. From the SDK FirstFoundationClient, copy alfresco.extensions package from the 'source' source folder and paste into the 'src/main/config' source directory of your project (i.e. 'orchestration-example'). This will include the files 'custom-alfresco-shared.xml', 'custom-repository-context.xml' and 'custom-repository.properties'
  3. From the SDK FirstFoundationClient, copy the org.alfresco.sample package and paste into the src/main/java source folder of your project. This will give us something to test running as Alfresco Embedded
  4. Update the 'custom-repository.properties' to point dir.root to your Alfresco installation
  5. Remove the JBPM library from project properties, as it will conflict with the Alfresco version of these dependencies
  6. I recommend that you modify the log4j.properties to set the root logger to INFO, CONSOLE not DEBUG, CONSOLE or you will be watching the log messages for half the day
Step 3 - Test it out
Run the FirstFoundationClient as Java Application. There should be no 'red ink' and the line near the end of the log messages should read something like 'Alfresco started (Labs): Current version 3.0.0 (Stable 1526) schema 1002 - Installed version 3.1.0 (142) schema 1008'
If you see this line, likely you were able to run using Alfresco Embedded SDK

Step 4 - Create an Embedded Alf test

To test within the Alfresco context using Embedded approach, your workflow must be deployed, and you must run your test code, like the FirstFoundationClient example within a transaction service callback.
We will create a base test class, extending TestCase of JUnit 3 to simplify writing tests like this.
package com.sample;

import junit.framework.TestCase;

import org.alfresco.repo.transaction.RetryingTransactionHelper.RetryingTransactionCallback;
import org.alfresco.service.ServiceRegistry;
import org.alfresco.service.transaction.TransactionService;
import org.alfresco.util.ApplicationContextHelper;
import org.apache.log4j.Logger;
import org.springframework.context.ApplicationContext;

public abstract class EmbeddedAlfTestBase extends TestCase {

Logger logger = Logger.getLogger(EmbeddedAlfTestBase.class);
protected ServiceRegistry serviceRegistry;
protected TransactionService transactionService;
protected ApplicationContext ctx;

public void setUp() throws Exception {
ctx = ApplicationContextHelper.getApplicationContext();
serviceRegistry = (ServiceRegistry) ctx.getBean(ServiceRegistry.SERVICE_REGISTRY);
transactionService = serviceRegistry.getTransactionService();
}

public void tearDown() throws Exception {
}

public void runTestInEmbeddedAlf(RetryingTransactionCallback<Object> testWork) throws Exception {
transactionService.getRetryingTransactionHelper().doInTransaction(testWork);
}
}
This code gets the application context and gets some services from Spring, including the serviceRegistry and the transactionService. The helper method, runtestInEmbeddedAlf takes a class of type RetryingtransactionCallback and runs it it using the transactionService's RetryingTransactionHelper doInTransaction(callback) method.

We will subclass this base test class and write our process test.
  1. Create a class PublishContentBasicProcessAlfTest, copying from PublishContentBasicProcessTest created in the previous blog entry.
  2. Change it to extend from EmbeddedAlfTestBase class
  3. Rename testSimpleProcess to a signature 'public void doTestSimpleProcess(ServiceRegistry serviceRegistry) throws Exception'
  4. Create a new testSimpleProcess like the following:
    public void testSimpleProcess() throws Exception {
RetryingTransactionCallback<Object> publishContentWFExistsCB = new RetryingTransactionCallback<Object>() {
public Object execute() throws Exception {
doTestSimpleProcess(serviceRegistry);
return null;
}
};
this.runTestInEmbeddedAlf(publishContentWFExistsCB);
}
Now run 'PublishContentBasicProcessAlfTest' as a JUnit test.
This should run as an alfresco project properly. But we are not leveraging Alfresco's services yet.

Step 5 - Test in Alf Using Workflow Service (foundation services)

What we are going to do:
  1. Authenticate and deploy in setUp for test
  2. Start workflow using workflow service
  3. Signal workflow using workflow service
Create a class PublishContentBasicProcessAlfTest extends EmbeddedAlfTestBase
To start, we will create a setUp() method to set us up for testing, like authenticating and deploying the service
    private WorkflowService workflowService;

public void setUp() throws Exception {
super.setUp();
workflowService = serviceRegistry.getWorkflowService();

authenticate("admin","admin");

deployDefinition(PROCESS_DEF_FILE);
}

We get the workflow service from the service registry (obtained in the setUp of the EmbeddedAlfTestBase class). Then we authenticate, and then deploy our process definition 'publichContentBasic/processdefinition.xml'.
Lets look at the methods we need to create:

authenticate method
    private void authenticate(String user, String password) {
AuthenticationService authenticationService = serviceRegistry.getAuthenticationService();
authenticationService.authenticate(user, password.toCharArray());

}

We get the AuthenticationService, and call authenticate. We need to do this first or else we wont be able to deploy our workflow.

deployDefinition method
    private WorkflowDeployment deployDefinition(String processDefName) {
//Deploy definition
String engineId = ENGINE_ID;
InputStream workflowDefinition = getClass().getResourceAsStream("/"+processDefName);
String mimeType = XML_MIMETYPE;
return workflowService.deployDefinition(engineId, workflowDefinition, mimeType);
}

We use the deployDefinition method of the workflow service. THis requires us to pass an engineId. this Id for jbpm is 'jbpm'. The mime type is 'text/xml'. The stream is obtained as a resource from this class loader by reading the 'publishContentBasic/processdefinition.xml' file.

Now we start the test like we did before, using the transactionservice and its callback:
    public void testSimpleProcess() throws Exception {
RetryingTransactionCallback<Object> publishContentWFExistsCB = new RetryingTransactionCallback<Object>() {
public Object execute() throws Exception {
doTestSimpleProcessInAlf();
return null;
}
};
this.runTestInEmbeddedAlf(publishContentWFExistsCB);

}

public void doTestSimpleProcessInAlf() throws Exception {

}


Ok. Now that we've got the test method ready. Lets put something in it. The first thing we have to do is start our workflow:
    public void doTestSimpleProcessInAlf() throws Exception {


NodeRef content = null;
String wfAssigneeName = "admin";
String workflowName = ENGINE_ID+"$"+PROCESS_DEF_NAME;

WorkflowPath wfPath = startWorkflow(content, wfAssigneeName, workflowName);
assertNotNull(wfPath);

assertEquals(
"Instance is in start state",
wfPath.node.name,
"start");

This calls the startWorkflow helper method with the content to go in the workflow package (currently null for testing purposes). We also need a name to assign the workflow to. We use 'admin'. And, finally we need the workflow name to start. Alfresco uses a naming convention prepending the engine id and a '$' to the beginning of BPM engine objects. The value for jbpm is 'jbpm'.

startWorkflow method
    private WorkflowPath startWorkflow(NodeRef content, String wfAssigneeName, String workflowName) throws Exception {
//Start workflow
NodeRef wfPackage = workflowService.createPackage(content );

PersonService personService = serviceRegistry.getPersonService();
NodeRef assigneeNodeRef = personService.getPerson(wfAssigneeName );

Map<QName, Serializable> workflowProps = new HashMap<QName, Serializable>(16);
workflowProps.put(WorkflowModel.ASSOC_PACKAGE, wfPackage);
workflowProps.put(WorkflowModel.ASSOC_ASSIGNEE, assigneeNodeRef);

// get the moderated workflow

WorkflowDefinition wfDefinition = workflowService.getDefinitionByName(workflowName );
if (wfDefinition == null) {
// handle workflow definition does not exist
throw new Exception("noworkflow: " + workflowName);
}

// start the workflow
WorkflowPath wfPath = workflowService.startWorkflow(wfDefinition.getId(), workflowProps);
return wfPath;
}
In this code, we create the package for the workflow that should contain the content we are workflowing. This is a content manager after all :). Next we get the user we will assign this workflow too. Since this process has no 'tasks', nothing will be noticable to the user. For this kind of process orchestration, the 'admin' user will do nicely. Perhaps in a real system, we want to create a special user just for back office processing like this?

Next we get the definition from the service using the given name 'jbpm$publishContentBasic'. Finally, we use the service to start the workflow, passing the definition and the workflow package. The startWorkflow service returns a WorkflowPath object. This corresponds to the workflow token of the execution of the workflow.

We can test this now to make sure we can deploy and start our workflow.

Next, we will signal the workflow to transition to the next state. This code snippet should be added to the end of the doTestSimpleProcessInAlf method
        // Move the process instance from its start state to the first state.
wfPath = signalTransition(wfPath, null);
assertEquals(
"Instance is in reqested state",
wfPath.node.name,
"requested");

Here we call the 'signalTransition' helper method passing the current path (token) and a transition name to take. Our helper method takes the first transition from the current state if no transition name is supplied.
signalTransition method
    private WorkflowPath signalTransition(WorkflowPath wfPath, String transitionName) throws Exception {
String wfPathId = wfPath.id;
WorkflowTransition[] wfTransitions = wfPath.node.transitions;
String wfTransitionId = null;
if (transitionName == null || transitionName.trim().length()==0) {
WorkflowTransition wfTransition = wfTransitions[0];
wfTransitionId = wfTransition.id;
} else {
int i = 0;
for (i = 0; i<wfTransitions.length; i++) {
if (wfTransitions[i].title.equals(transitionName)) break;
}
if (i > wfTransitions.length) throw new Exception("Failed to find transition with nanme '"+transitionName+"'");
WorkflowTransition wfTransition = wfTransitions[i];
wfTransitionId = wfTransition.id;
}

wfPath = workflowService.signal(wfPathId, wfTransitionId);
return wfPath;
}

Ok. This pattern can be repeated to transition to the next states to complete our test
        //move to processing state
wfPath = signalTransition(wfPath, null);
assertEquals(
"Instance is in processing state",
"processing",
wfPath.node.name);

//move to succeeded state
wfPath = signalTransition(wfPath, "to_succeeded");
assertEquals(
"Instance is in processing state",
"succeeded",
wfPath.node.name);

// Move the process instance to the end state. The configured action
// should execute again. The message variable contains a new value.
wfPath = signalTransition(wfPath, null);
assertEquals(
"Instance is in end state",
"end",
wfPath.node.name);
}


This completes the code to use the workflow service foundation client approach to deploy, start and signal our workflow.

Here is the complete code of the PublishContentBasicAlfTest
package com.sample;

import java.io.InputStream;
import java.io.Serializable;
import java.util.HashMap;
import java.util.Map;

import org.alfresco.repo.transaction.RetryingTransactionHelper.RetryingTransactionCallback;
import org.alfresco.repo.workflow.WorkflowModel;
import org.alfresco.service.cmr.repository.NodeRef;
import org.alfresco.service.cmr.security.AuthenticationService;
import org.alfresco.service.cmr.security.PersonService;
import org.alfresco.service.cmr.workflow.WorkflowDefinition;
import org.alfresco.service.cmr.workflow.WorkflowDeployment;
import org.alfresco.service.cmr.workflow.WorkflowPath;
import org.alfresco.service.cmr.workflow.WorkflowService;
import org.alfresco.service.cmr.workflow.WorkflowTransition;
import org.alfresco.service.namespace.QName;

public class PublishContentBasicProcessAlfTest extends EmbeddedAlfTestBase {

private static final String XML_MIMETYPE = "text/xml";
private static final String PROCESS_DEF_FILE = "publishContentBasic/processdefinition.xml";
private static final String PROCESS_DEF_NAME = "publishContentBasic";
private static final String ENGINE_ID = "jbpm";

private WorkflowService workflowService;

public void setUp() throws Exception {
super.setUp();
workflowService = serviceRegistry.getWorkflowService();

authenticate("admin","admin");

deployDefinition(PROCESS_DEF_FILE);
}

public void tearDown() throws Exception {
super.tearDown();
}

public void testSimpleProcess() throws Exception {
RetryingTransactionCallback<Object> publishContentWFExistsCB = new RetryingTransactionCallback<Object>() {
public Object execute() throws Exception {
doTestSimpleProcessInAlf();
return null;
}
};
this.runTestInEmbeddedAlf(publishContentWFExistsCB);

}

public void doTestSimpleProcessInAlf() throws Exception {


NodeRef content = null;
String wfAssigneeName = "admin";
String workflowName = ENGINE_ID+"$"+PROCESS_DEF_NAME;

WorkflowPath wfPath = startWorkflow(content, wfAssigneeName, workflowName);
assertNotNull(wfPath);

assertEquals(
"Instance is in start state",
wfPath.node.name,
"start");

// Move the process instance from its start state to the first state.
wfPath = signalTransition(wfPath, null);
assertEquals(
"Instance is in reqested state",
wfPath.node.name,
"requested");

//move to processing state
wfPath = signalTransition(wfPath, null);
assertEquals(
"Instance is in processing state",
"processing",
wfPath.node.name);

//move to succeeded state
wfPath = signalTransition(wfPath, "to_succeeded");
assertEquals(
"Instance is in processing state",
"succeeded",
wfPath.node.name);

// Move the process instance to the end state. The configured action
// should execute again. The message variable contains a new value.
wfPath = signalTransition(wfPath, null);
assertEquals(
"Instance is in end state",
"end",
wfPath.node.name);
}

private WorkflowPath startWorkflow(NodeRef content, String wfAssigneeName, String workflowName) throws Exception {
//Start workflow
NodeRef wfPackage = workflowService.createPackage(content );

PersonService personService = serviceRegistry.getPersonService();
NodeRef assigneeNodeRef = personService.getPerson(wfAssigneeName );

Map<QName, Serializable> workflowProps = new HashMap<QName, Serializable>(16);
workflowProps.put(WorkflowModel.ASSOC_PACKAGE, wfPackage);
workflowProps.put(WorkflowModel.ASSOC_ASSIGNEE, assigneeNodeRef);

// get the moderated workflow

WorkflowDefinition wfDefinition = workflowService.getDefinitionByName(workflowName );
if (wfDefinition == null) {
// handle workflow definition does not exist
throw new Exception("noworkflow: " + workflowName);
}

// start the workflow
WorkflowPath wfPath = workflowService.startWorkflow(wfDefinition.getId(), workflowProps);
return wfPath;
}

private WorkflowDeployment deployDefinition(String processDefName) {
//Deploy definition
String engineId = ENGINE_ID;
InputStream workflowDefinition = getClass().getResourceAsStream("/"+processDefName);
String mimeType = XML_MIMETYPE;
return workflowService.deployDefinition(engineId, workflowDefinition, mimeType);
}

private WorkflowPath signalTransition(WorkflowPath wfPath, String transitionName) throws Exception {
String wfPathId = wfPath.id;
WorkflowTransition[] wfTransitions = wfPath.node.transitions;
String wfTransitionId = null;
if (transitionName == null || transitionName.trim().length()==0) {
WorkflowTransition wfTransition = wfTransitions[0];
wfTransitionId = wfTransition.id;
} else {
int i = 0;
for (i = 0; i<wfTransitions.length; i++) {
if (wfTransitions[i].title.equals(transitionName)) break;
}
if (i > wfTransitions.length) throw new Exception("Failed to find transition with nanme '"+transitionName+"'");
WorkflowTransition wfTransition = wfTransitions[i];
wfTransitionId = wfTransition.id;
}

wfPath = workflowService.signal(wfPathId, wfTransitionId);
return wfPath;
}

private boolean authenticate(String user, String password) {
AuthenticationService authenticationService = serviceRegistry.getAuthenticationService();
authenticationService.authenticate(user, password.toCharArray());
return authenticationService.authenticationExists(user);
}
}


In the next blog post, we will use alfresco scripts in the workflow definition we have just created. And finally, for orchestration, we will interact with JMS.

Working with jBPM workflows in Alfresco - Part 1: jBPM

The following set of blog articles will track my usage of jBPM in Alfresco to help orchestrate external content processing for publishing, and integrate with Review and Approval Advanced workflows.

Step 1 - Design
In order to collaborate with external publishing processes, we have chosen to use JMS topics. This approach offers robustness and flexibility in communication. The workflow described here will be an 'orchestration' workflow. Its responsibility is to call out external processes and monitor progress. This workflow will be associated to content, however, the content will be in the form of a 'work order' that is created when a user requests to publish a set of content. The user may view the workflow on this work order to see the progress of the external processes orchestrated by the workflow. Later on, we will integrate with the publish review and approve workflow where user tasks will be created to coordinate user activity.

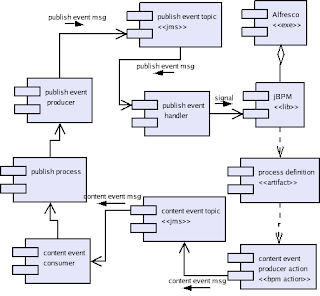
Alfresco will be the container for the orchestration workflows. Actions in the workflow will be responsible for creating and sending messages to JMS topics to choreograph external publishing processes. A simulator will be used to act as the publisher processes for testing purposes. ActiveMQ is used as the JMS provider in these examples. There will also be a message handler created with the responsibi8lity of subscribing to topics that the publisher processes use to provide feedback and communicate status to the workflow. The following diagram represents this intended configuration.


Component descriptions:
  • Alfresco - contains jbpm implementation and content being workflowed
  • jBPM - library for jBPM accessed via the workflowService
  • process definition - jBPM process defining the process steps to orchestrate the publishing process
  • content event producer action - BPM action invoked from process to publish a content event message to the content topic
  • content event message - jms message indicating which content to publish and where to publish too
  • content event topic - jms topic storing the content event messages to be processed by the publisher
  • content event consumer - consumes content event messages and calls publishing services to invoke the publishing processes
  • publish process - implements the publishing functionality and calls publisher event producer to
  • publish event producer - creates and publishes publish event messages to the publish event topic indicating status of publishing
  • publish event consumer handler - consumes publish event messages and signals corresponding transitions on the publish process definition via the jbpm library

Step 2 - Environment Setup
  1. Install Alfresco SDK: follow instructions on the alfresco wiki
  2. Install ActiveMQ: follow the instructions on the ActiveMQ site
  3. Install jBPM (3.2.x): follow the instructions on the JBoss jBPM site: I installed jbpm-3.2.2 for best compatibility with Alfresco
  4. Install jBPM Process Designer
Note: compatibility problems. As of Alfresco 3.1, the jBPM 3.2.2 is supported. The only issue I had with this version is that there are no hibernate tasks for the Mail Node.

Step 3 - Create the Eclipse Project
For this project, I created a project called 'orchestration -example' using the jboss - jbpm process project' wizard.

Step 4 - Create the process
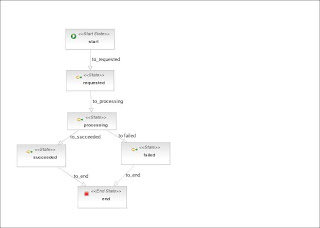
The following image shows the workflow configuration created to orchestrate and monitor the publishing process.
Workflow states:
  • Start - initial state when workflow is created
  • Requested - state indicating that a request was made to the publisher (the content event msg was sent to the content topic)
  • Processing - state indicating that the publisher has received the request and is processing
  • Succeeded - the publish process completed normally
  • Failed - the publish process failed
  • End - workflow has ended
Using this workflow, the state can be queried to indicate the status of the publishing process.
Here is the first version of this process definition:
<?xml version="1.0" encoding="UTF-8"?>

<process-definition xmlns="urn:jbpm.org:jpdl-3.2" name="publishContentBasic">
<start-state name="start">
<transition name="to_requested" to="requested">
<action name="action" class="com.sample.action.MessageActionHandler">
<message>Going to the first state - requested!</message>
</action>
</transition>
</start-state>

<state name="requested">
<transition to="processing" name="to_processing"></transition>
</state>

<state name="processing">
<transition to="succeeded" name="to_succeeded"></transition>
<transition to="failed" name="to_failed"></transition>
</state>

<state name="succeeded">
<transition to="end" name="to_end">
<action name="action" class="com.sample.action.MessageActionHandler">
<message>About to finish - succeeded!</message>
</action>
</transition>
</state>

<state name="failed">
<transition to="end" name="to_end">
<action name="action" class="com.sample.action.MessageActionHandler">
<message>About to finish - failed!</message>
</action>
</transition>
</state>

<end-state name="end"></end-state>
</process-definition>
This first configuration of the process is basic and simple. It will be embellished later with processing and business logic. This example uses the com.sample.action.MessageActionHandler class that is created by default using the 'create jbpm project' option in Eclipse.

Step 5 - The first test
In this first pass, we are using jBPM out of the box, without Alfresco. This mode allows us to configure and test our process in as much isolation as possible. Later we will use the Alfresco SDK to run as an Embedded Alfresco when we need Alfresco workflow services.

package com.sample;

import junit.framework.TestCase;

import org.jbpm.graph.def.ProcessDefinition;
import org.jbpm.graph.exe.ProcessInstance;

public class PublishContentBasicProcessTest extends TestCase {

public void testSimpleProcess() throws Exception {

// Extract a process definition from the processdefinition.xml file.
ProcessDefinition processDefinition = ProcessDefinition.parseXmlResource("publishContentBasic/processdefinition.xml");
assertNotNull("Definition should not be null", processDefinition);

// Create an instance of the process definition.
ProcessInstance instance = new ProcessInstance(processDefinition);
assertEquals(
"Instance is in start state",
instance.getRootToken().getNode().getName(),
"start");
assertNull(
"Message variable should not exist yet",
instance.getContextInstance().getVariable("message"));

// Move the process instance from its start state to the first state.
// The configured action should execute and the appropriate message
// should appear in the message process variable.
instance.signal();
assertEquals(
"Instance is in reqested state",
instance.getRootToken().getNode().getName(),
"requested");
assertEquals(
"Message variable contains message",
"Going to the first state - requested!",
instance.getContextInstance().getVariable("message"));

//move to processing state
instance.signal();
assertEquals(
"Instance is in processing state",
"processing",
instance.getRootToken().getNode().getName());

//move to succeeded state
instance.signal("to_succeeded");
assertEquals(
"Instance is in processing state",
"succeeded",
instance.getRootToken().getNode().getName());

// Move the process instance to the end state. The configured action
// should execute again. The message variable contains a new value.
instance.signal();
assertEquals(
"Instance is in end state",
"end",
instance.getRootToken().getNode().getName());
assertTrue("Instance has ended", instance.hasEnded());
assertEquals(
"Message variable contains message",
"About to finish!",
instance.getContextInstance().getVariable("message"));
}
}
Next Part, on to running workflows in Alfresco Embedded mode and running alfresco scripts in the workflow.


This

Thursday, January 8, 2009

Extending Share 3 - Adding new pages to share

In a previous blog article 'Extending Share 2 - Adding a New Content button to Document Library', we walked through the process of modifying Document Library to add a new toolbar component that included a button titled 'New Content'. In this article, We will walk through the process of creating a new page for Share that can be included for a site, adding to the existing pages including wiki, blog, discussion, document library, calendar etc. that can be selected from the site navigation bar. As an example, the new page we add will present a new view of document library content, leveraging some existing components form the Document Library page such as the tree navigation component.

This blog article will add these new pages into the share extension project structure discussed in the previous blog article 'Extending Share 1 - Creating a share extension project' that provides a clean way to isolate our changes from the existing share code. The new page will be able to be added to existing or new sites by using the 'Customize Site' feature of the site dashboard and selecting the new page.

Step 1 - Setting up the project

We will start with creating a project structure similar to that referenced in the previous blog article 'Extending Share 1 - Creating a share extension project' and the latest Alfresco SDK.

1. Create a new project (i.e. 'someco-share-extension') with the following source directories :

  • source/java - contains java code to be packaged in someco-share-ext.jar
  • config/alfresco/web-extension - contains 'web-framework-config-custom.xml'
  • config/alfresco/web-extension/site-data - contains custom model objects like pages, template-instances, and components
  • config/alfresco/web-extension/site-webscripts containing folder /com/someco to contain webscripts in a unique namespace
  • config/alfresco/templates - contains custom templates containing folder /com/someco to contain templates in unique namespace
  • source/web - contains web assets and delivered to the war, used for javascript and css as included by html templates
  • lib - contains required library elements (includes junit.jar for testing
  • test - contains java test code and configuration
I created each of these folders as a 'source directory' in Eclipse. Source directories in Eclipse automatically copy files to the classpath. This project depends on SDK Embedded to allow embedded testing (unit testing of custom data web scripts) (see the 'Unit Testing Web Scripts' blog article for using the SDK to run embedded unit tests of data web scripts.

2. Create the 'web-framework-config-custom.xml' file in the to contain a reference to our new page so that it can be included by customizing a site.

3. Copy the ant build.xml file from the source in the previous 'Extending Share' blog article into the root of the project. This build script has some handy tasks. Some of which were derived from the great works by Jeff Potts and his great new book Alfresco Developers Guide from Packt Publishing. Make sure to change the project name in the build.xml file as appropriate (i.e. 'someco-share-extension').

  • The 'deploy' tasks will call the 'package' task and copy the created jar to the APP_TOMCAT_HOME/WEB-INF/lib directory (should be configured to point to the expanded share war file directory in tomcat), and copy the contents of the 'source/web' and 'config/alfresco/*' folders to the APP_TOMCAT_HOME/WEB-INF/classes/alfresco directory.
  • The 'package' task will call the 'compile' taks and create a jar (someco-share-ext.jar) including our java code in the source/java folder, web scripts in the 'config/someco/site-webscripts' and templates in the 'config/someco/templates' folders.
Make sure APP_TOMCAT_HOME environment variable is configured to point to the directory where share war is deployed. In Eclipse, you can add this to the ant configuration (windows > preferences > ant > runtime, 'properties' tab as env.APP_TOMCAT_HOME).

4. Create (or copy) the build.properties file to the project root directory containing the following:
#directory names

dir.name.assemble=assemble
dir.name.bin=bin
dir.name.build=build
dir.name.classes=classes
dir.name.config=config
dir.name.source=source
dir.name.devenv=devenv
dir.name.dist=dist
dir.name.distro=distro
dir.name.docs=docs
dir.name.generated=generated
dir.name.java=java
dir.name.lib=lib
dir.name.test.results=
dir.name.test.results=test-results
dir.name.test.resources=test-resources
dir.name.web=web

file.name.jar=someco-share-ext.jar

dir.junit.lib=lib

Now we are ready to start creating our custom configuration. You can adjust these to make the ant build work with your own project structure.

Step 2 - Creating the page and template instance

To start out, we will create a new page called 'Content Grid' that is intended to display a list of content in a way similar to Document Library but as a grid showing meta-data and a content extract in columns. This extension follows the model object structure as outlined in the Alfresco Surf Platform - Developers Guide page, and analyzed in the 'Learning Surf 2 - Examining Slingshot configuration' blog article.

The custom model objects we create will be added to the 'config/alfresco/web-extension' source directory. The contents of this directory will be copied into the Share war directory using the ant deploy task in the Ant build file.

1. Create 'contentgrid.xml' file in the 'pages' folder of the 'source/alfresco/web-extension/site-data' source directory, with the following content:
<?xml version='1.0' encoding='UTF-8'?>
<page>
<title>Content Grid</title>
<description>Document library with Tree view</description>
<template-instance>contentgrid</template-instance>
<authentication>user</authentication>
</page>
This defines a page with the title 'Content Grid'. It refers to a template instance called 'contentgrid' defined next.

2. Create the 'contentgrid.xml' template instance in the 'template-instances' folder of the 'config/alfresco/web-extension/site-data' source folder with the following contents:
<?xml version='1.0' encoding='UTF-8'?>
<template-instance>
<template-type>org/alfresco/simple-contentgrid</template-type>
<properties>
<hasBreadcrumb>true</hasBreadcrumb>
<hasTreeview>true</hasTreeview>
<hasPackager>true</hasPackager>
</properties>
</template-instance>
This file tells Surf to use the template found from path org/alfresco/contentgrid path of the config/alfresco/templates folder.

Step 3 - Creating the template type

The template we will create first will be a simple test template with no functionality, to test our configuration and deployment. This template is a gutted out version of the documentlibrary.ftl found in the config/alfresco/templates source folder in the org/alfresco package. It includes a standard set of included global regions with a simple body announcing that the template has rendered.

1. Create 'simple-contentgrid.ftl' freemarker template in the org/alfresco path of the 'config/alfresco/templates' source folder with the following contents:
<#import "/org/alfresco/import/alfresco-template.ftl" as template />
<@template.header>
<link rel="stylesheet" type="text/css" href="${url.context}/templates/documentlibrary/documentlibrary.css" />
<script type="text/javascript">//<![CDATA[
(function()
{
// If no location.hash exists, convert a location.search to a location.hash and replace the page
var loc = window.location;
if (loc.hash === "" && loc.search !== "")
{
var url = loc.protocol + "//" + loc.host + loc.pathname + "#" + loc.search.substring(1);
window.location.replace(url);
}
})();
//]]></script>
<script type="text/javascript" src="${url.context}/templates/documentlibrary/documentlibrary.js"></script>
<script type="text/javascript" src="${url.context}/modules/documentlibrary/doclib-actions.js"></script>
</@>

<@template.body>
<div id="hd">
<@region id="header" scope="global" protected=true />
<@region id="title" scope="template" protected=true />
<@region id="navigation" scope="template" protected=true />
</div>
<div id="bd">
This is the Content Grid template
</div>
<p>&nbsp;</p>
<p>&nbsp;</p>
</@>

<@template.footer>
<div id="ft">
<@region id="footer" scope="global" protected=true />
</div>
</@>

2. Modify 'web-framework-config-custom.xml' file in the 'config/alfresco/web-extensions' folder to add a reference to the new page we just created to allow this page to be added when customizing the site. It should read:
<alfresco-config>


<config evaluator="string-compare" condition="SitePages" replace="true">
<pages>
<page id="calendar">calendar</page>
<page id="wiki-page">wiki-page?title=Main_Page</page>
<page id="documentlibrary">documentlibrary</page>
<page id="contentgrid">contentgrid</page>
<page id="discussions-topiclist">discussions-topiclist</page>
<page id="blog-postlist">blog-postlist</page>
</pages>
</config>

</alfresco-config>
When Share is started, the new page will not be configured to display with any sites. The new page can be added to existing sites by using the 'customize site' feature. If you wish this new page to be automatically added to new sites, add it to the 'presets.xml' file.

3. Run the ant deploy task to copy the configuration components to the deployed share war (APP_TOMCAT_HOME/webapps/share)

4. Start alfresco and share by starting tomcat

5. Login to share

6. Create the new site (or select it if already created)

7. Select the 'Customize Site' button and click 'Add Page' and select the 'Content Grid' page. The 'Content Grid' page should be added to the navigation bar.

8. Press this option to see the page we just created with the simple-contentgrid.ftl template. The message 'This is the Content Grid template' should be displayed.

Step 4 - Mapping the page components
Now we can advance to a more interesting page template. The previous simple-contentgrid.ftl only demonstrated that we could add a page and it would render, now we will create a page template that will be similar to the Document Library template, but display our custom grid view UI.
1. create contentgrid.ftl in the /org/alfresco directory of the /config/alfresco/templates source folder, with containing the following:
<#import "/org/alfresco/import/alfresco-template.ftl" as template />
<@template.header>
<link rel="stylesheet" type="text/css" href="${url.context}/templates/documentlibrary/documentlibrary.css" />
<script type="text/javascript">//<![CDATA[
(function()
{
// If no location.hash exists, convert a location.search to a location.hash and replace the page
var loc = window.location;
if (loc.hash === "" && loc.search !== "")
{
var url = loc.protocol + "//" + loc.host + loc.pathname + "#" + loc.search.substring(1);
window.location.replace(url);
}
})();
//]]></script>
<script type="text/javascript" src="${url.context}/templates/documentlibrary/documentlibrary.js"></script>
<script type="text/javascript" src="${url.context}/modules/documentlibrary/doclib-actions.js"></script>
</@>

<@template.body>
<div id="hd">
<@region id="header" scope="global" protected=true />
<@region id="title" scope="template" protected=true />
<@region id="navigation" scope="template" protected=true />
</div>
<div id="bd">
<div class="yui-t1" id="divDocLibraryWrapper">
<div id="yui-main">
<div class="yui-b" id="divDocLibraryDocs">
<@region id="toolbar" scope="template" protected=true />
<@region id="gridview" scope="template" protected=true />
</div>
</div>
<div class="yui-b" id="divDocLibraryFilters">
<@region id="filter" scope="template" protected=true />
<@region id="tree" scope="template" protected=true />
<@region id="tags" scope="template" protected=true />
</div>
</div>
</div>
<p>&nbsp;</p>
<p>&nbsp;</p>
</@>

<@template.footer>
<div id="ft">
<@region id="footer" scope="global" protected=true />
</div>
</@>


This template contains several regions, some global and some template specific. The template specific regions must have component configuraton xml files to indicate what ui webscript will be used to render in that region. The components follow a naming convention: ..