- Part 1 - Install and Create Back end
- Part 2 - Web MVC (this blog)
- Part 3 - GWT
- Part 4 - Custom app from scratch
Part 2 - Adding a front end with Spring MVC and JSP
To summarize the previous blog,
- installed Spring StS
- created a spring project named 'pizza' to package 'com.springsource.pizzashop'
- executed the following in spring roo's shell:
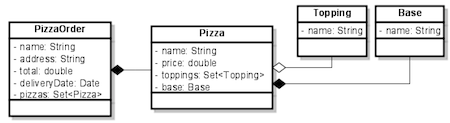
// Spring Roo 1.1.4.RELEASE [rev f787ce7] log opened at 2012-03-17 10:38:04
project --topLevelPackage com.springsource.roo.pizzashop --projectName pizza --java 6
// Spring Roo 1.1.4.RELEASE [rev f787ce7] log closed at 2012-03-17 10:38:15
// Spring Roo 1.1.4.RELEASE [rev f787ce7] log opened at 2012-03-17 10:38:19
hint
hint
persistence setup --database HYPERSONIC_IN_MEMORY --provider HIBERNATE
hint
entity --class ~.domain.Topping --testAutomatically
field string --fieldName name --notnull --sizeMin 2
entity --class ~.domain.Base --testAutomatically
field string --fieldName name --notNull --sizeMin 2
entity --class ~.domain.Pizza --testAutomatically
field string --fieldName name --notNull --sizeMin 2
field number --fieldName price --type java.lang.Float

field set --fieldName toppings --type ~.domain.Topping
field reference --fieldName base --type ~.domain.Base
entity --class ~.domain.PizzaOrder --testAutomatically
field string --fieldName name --notNull --sizeMin 2
field string --fieldName address --sizeMax 30
field number --fieldName total --type java.lang.Float
field date --fieldName deliveryDate --type java.util.Date

field set --fieldName pizzas --type ~.domain.Pizza
perform tests
No we will add a user interface.
Step 1 - setup Spring MVC
In Roo shell type:
- web mvc setup
The web mvc setup does a lot. We really need to drill down here if we hope to understand the science behind the magic. But you can skip to Step 2 if you are impatient. After the code is generated it may work in a basic way, but you always have to muck with the details to make it work the way you want it to.
Here is the output from Spring Roo shell:
Here is the output from Spring Roo shell:
Created SRC_MAIN_WEBAPP\WEB-INF\spring
Created SRC_MAIN_WEBAPP\WEB-INF\spring\webmvc-config.xml
Created SRC_MAIN_WEBAPP\WEB-INF\web.xml
Created SRC_MAIN_WEBAPP\images
Created SRC_MAIN_WEBAPP\images\create.png
Created SRC_MAIN_WEBAPP\images\list.png
Created SRC_MAIN_WEBAPP\images\resultset_previous.png
Created SRC_MAIN_WEBAPP\images\resultset_next.png
Created SRC_MAIN_WEBAPP\images\show.png
Created SRC_MAIN_WEBAPP\images\favicon.ico
Created SRC_MAIN_WEBAPP\images\delete.png
Created SRC_MAIN_WEBAPP\images\resultset_first.png
Created SRC_MAIN_WEBAPP\images\springsource-logo.png
Created SRC_MAIN_WEBAPP\images\resultset_last.png
Created SRC_MAIN_WEBAPP\images\add.png
Created SRC_MAIN_WEBAPP\images\banner-graphic.png
Created SRC_MAIN_WEBAPP\images\update.png
Created SRC_MAIN_WEBAPP\styles
Created SRC_MAIN_WEBAPP\styles\alt.css
Created SRC_MAIN_WEBAPP\styles\standard.css
Created SRC_MAIN_WEBAPP\WEB-INF\classes
Created SRC_MAIN_WEBAPP\WEB-INF\classes\standard.properties
Created SRC_MAIN_WEBAPP\WEB-INF\classes\alt.properties
Created SRC_MAIN_WEBAPP\WEB-INF\layouts
Created SRC_MAIN_WEBAPP\WEB-INF\layouts\default.jspx
Created SRC_MAIN_WEBAPP\WEB-INF\layouts\layouts.xml
Created SRC_MAIN_WEBAPP\WEB-INF\views
Created SRC_MAIN_WEBAPP\WEB-INF\views\header.jspx
Created SRC_MAIN_WEBAPP\WEB-INF\views\footer.jspx
Created SRC_MAIN_WEBAPP\WEB-INF\views\views.xml
Created SRC_MAIN_WEBAPP\WEB-INF\views\index.jspx
Created SRC_MAIN_WEBAPP\WEB-INF\views\index-template.jspx
Created SRC_MAIN_WEBAPP\WEB-INF\views\uncaughtException.jspx
Created SRC_MAIN_WEBAPP\WEB-INF\views\resourceNotFound.jspx
Created SRC_MAIN_WEBAPP\WEB-INF\views\dataAccessFailure.jspx
Created SRC_MAIN_WEBAPP\WEB-INF\tags\form
Created SRC_MAIN_WEBAPP\WEB-INF\tags\form\update.tagx
Created SRC_MAIN_WEBAPP\WEB-INF\tags\form\create.tagx
Created SRC_MAIN_WEBAPP\WEB-INF\tags\form\dependency.tagx
Created SRC_MAIN_WEBAPP\WEB-INF\tags\form\show.tagx
Created SRC_MAIN_WEBAPP\WEB-INF\tags\form\list.tagx
Created SRC_MAIN_WEBAPP\WEB-INF\tags\form\find.tagx
Created SRC_MAIN_WEBAPP\WEB-INF\tags\form\fields
Created SRC_MAIN_WEBAPP\WEB-INF\tags\form\fields\select.tagx
Created SRC_MAIN_WEBAPP\WEB-INF\tags\form\fields\display.tagx
Created SRC_MAIN_WEBAPP\WEB-INF\tags\form\fields\column.tagx
Created SRC_MAIN_WEBAPP\WEB-INF\tags\form\fields\editor.tagx
Created SRC_MAIN_WEBAPP\WEB-INF\tags\form\fields\checkbox.tagx
Created SRC_MAIN_WEBAPP\WEB-INF\tags\form\fields\simple.tagx
Created SRC_MAIN_WEBAPP\WEB-INF\tags\form\fields\input.tagx
Created SRC_MAIN_WEBAPP\WEB-INF\tags\form\fields\textarea.tagx
Created SRC_MAIN_WEBAPP\WEB-INF\tags\form\fields\datetime.tagx
Created SRC_MAIN_WEBAPP\WEB-INF\tags\form\fields\table.tagx
Created SRC_MAIN_WEBAPP\WEB-INF\tags\form\fields\reference.tagx
Created SRC_MAIN_WEBAPP\WEB-INF\tags\menu
Created SRC_MAIN_WEBAPP\WEB-INF\tags\util
Created SRC_MAIN_WEBAPP\WEB-INF\tags\util\pagination.tagx
Created SRC_MAIN_WEBAPP\WEB-INF\tags\util\theme.tagx
Created SRC_MAIN_WEBAPP\WEB-INF\tags\util\placeholder.tagx
Created SRC_MAIN_WEBAPP\WEB-INF\tags\util\panel.tagx
Created SRC_MAIN_WEBAPP\WEB-INF\tags\util\language.tagx
Created SRC_MAIN_WEBAPP\WEB-INF\tags\util\load-scripts.tagx
Created SRC_MAIN_WEBAPP\WEB-INF\i18n
Created SRC_MAIN_WEBAPP\WEB-INF\i18n\messages.properties
Created SRC_MAIN_WEBAPP\images\en.png
Updated SRC_MAIN_WEBAPP\WEB-INF\i18n\application.properties
Updated SRC_MAIN_WEBAPP\WEB-INF\web.xml
Updated ROOT\pom.xml [added dependencies org.springframework:spring-web:${spring.version}, org.springframework:spring-webmvc:${spring.version}, org.springframework.webflow:spring-js-resources:2.2.1.RELEASE, commons-digester:commons-digester:2.0, commons-fileupload:commons-fileupload:1.2.1, javax.servlet:jstl:1.2, javax.el:el-api:1.0, joda-time:joda-time:1.6, javax.servlet.jsp:jsp-api:2.1, commons-codec:commons-codec:1.4; updated project type to war; added dependencies org.apache.tiles:tiles-core:2.2.1, org.apache.tiles:tiles-jsp:2.2.1]
Updated SRC_MAIN_WEBAPP\WEB-INF\spring\webmvc-config.xml
Updated SRC_MAIN_WEBAPP\WEB-INF\views\footer.jspx
Let's look at a couple of things here to understand what happened. This is just the 'framework' of supporting configurations and code of a fully functional web application based on Spring MVC with JSP pages and Apache Tiles with layout. In spring MVC, one place to look in Spring MVC is the spring config file so see how your application is configured, here it is found in SRC_MAIN_WEBAPP\WEB-INF\spring\webmvc-config.xml
<?xml version="1.0" encoding="UTF-8" standalone="no"?>
<beans xmlns="http://www.springframework.org/schema/beans" xmlns:context="http://www.springframework.org/schema/context" xmlns:mvc="http://www.springframework.org/schema/mvc" xmlns:p="http://www.springframework.org/schema/p" xmlns:xsi="http://www.w3.org/2001/XMLSchema-instance" xsi:schemaLocation="http://www.springframework.org/schema/beans http://www.springframework.org/schema/beans/spring-beans-3.0.xsd     http://www.springframework.org/schema/context http://www.springframework.org/schema/context/spring-context-3.0.xsd     http://www.springframework.org/schema/mvc http://www.springframework.org/schema/mvc/spring-mvc-3.0.xsd">

 <!-- The controllers are autodetected POJOs labeled with the @Controller annotation. -->
 <context:component-scan base-package="com.springsource.roo.pizzashop" use-default-filters="false">
  <context:include-filter expression="org.springframework.stereotype.Controller" type="annotation"/>
 </context:component-scan>

 <!-- Turns on support for mapping requests to Spring MVC @Controller methods
      Also registers default Formatters and Validators for use across all @Controllers -->
 <mvc:annotation-driven/>

 <!-- Handles HTTP GET requests for /resources/** by efficiently serving up static resources -->
 <mvc:resources location="/, classpath:/META-INF/web-resources/" mapping="/resources/**"/>

 <!-- Allows for mapping the DispatcherServlet to "/" by forwarding static resource requests to the container's default Servlet -->
 <mvc:default-servlet-handler/>

 <!-- register "global" interceptor beans to apply to all registered HandlerMappings -->
 <mvc:interceptors>
  <bean class="org.springframework.web.servlet.theme.ThemeChangeInterceptor"/>
  <bean class="org.springframework.web.servlet.i18n.LocaleChangeInterceptor" p:paramName="lang"/>
 </mvc:interceptors>

 <!-- selects a static view for rendering without the need for an explicit controller -->
 <mvc:view-controller path="/" view-name="index"/>
 <mvc:view-controller path="/uncaughtException"/>
 <mvc:view-controller path="/resourceNotFound"/>
 <mvc:view-controller path="/dataAccessFailure"/>

 <!-- Resolves localized messages*.properties and application.properties files in the application to allow for internationalization.
  The messages*.properties files translate Roo generated messages which are part of the admin interface, the application.properties
  resource bundle localizes all application specific messages such as entity names and menu items. -->
 <bean class="org.springframework.context.support.ReloadableResourceBundleMessageSource" id="messageSource" p:basenames="WEB-INF/i18n/messages,WEB-INF/i18n/application" p:fallbackToSystemLocale="false"/>

 <!-- store preferred language configuration in a cookie -->
 <bean class="org.springframework.web.servlet.i18n.CookieLocaleResolver" id="localeResolver" p:cookieName="locale"/>

 <!-- resolves localized <theme_name>.properties files in the classpath to allow for theme support -->
 <bean class="org.springframework.ui.context.support.ResourceBundleThemeSource" id="themeSource"/>

 <!-- store preferred theme configuration in a cookie -->
 <bean class="org.springframework.web.servlet.theme.CookieThemeResolver" id="themeResolver" p:cookieName="theme" p:defaultThemeName="standard"/>

 <!-- This bean resolves specific types of exceptions to corresponding logical - view names for error views.
      The default behaviour of DispatcherServlet - is to propagate all exceptions to the servlet container:
      this will happen - here with all other types of exceptions. -->
 <bean class="org.springframework.web.servlet.handler.SimpleMappingExceptionResolver" p:defaultErrorView="uncaughtException">
  <property name="exceptionMappings">
   <props>
    <prop key=".DataAccessException">dataAccessFailure</prop>
    <prop key=".NoSuchRequestHandlingMethodException">resourceNotFound</prop>
    <prop key=".TypeMismatchException">resourceNotFound</prop>
    <prop key=".MissingServletRequestParameterException">resourceNotFound</prop>
   </props>
  </property>
 </bean>

 <!-- allows for integration of file upload functionality -->
 <bean class="org.springframework.web.multipart.commons.CommonsMultipartResolver" id="multipartResolver"/>
<bean class="org.springframework.web.servlet.view.UrlBasedViewResolver" id="tilesViewResolver">
    <property name="viewClass" value="org.springframework.web.servlet.view.tiles2.TilesView"/>
  </bean>
    <bean class="org.springframework.web.servlet.view.tiles2.TilesConfigurer" id="tilesConfigurer">
    <property name="definitions">
      <list>
        <value>/WEB-INF/layouts/layouts.xml</value>
        <!-- Scan views directory for Tiles configurations -->
        <value>/WEB-INF/views/**/views.xml</value>
      </list>
    </property>
  </bean>
</beans>
Most of this is well documented and standard. But I would point out a couple of things. The top of this configuration defines how controllers are found. In spring MVC, rather than a monolythic servlet, the url requests are dispatched to controllers. Controllers are java classes annotated with @Controller that handle the requests and generate responses (typically by delegating to a view resolver that can render a jspx page or a tiles definition (or other technology)).
The below snippet shows that we are using spring MVCs component scan ccapability to find controllers by looking for the Controller stereotype (@Controller marker) in the com.springsource.roo.pizzashop base package. The next command will generate these contollers for each domain class we have created.
<!-- The controllers are autodetected POJOs labeled with the @Controller annotation. -->
 <context:component-scan base-package="com.springsource.roo.pizzashop" use-default-filters="false">
  <context:include-filter expression="org.springframework.stereotype.Controller" type="annotation"/>
 </context:component-scan>

 <!-- Turns on support for mapping requests to Spring MVC @Controller methods
      Also registers default Formatters and Validators for use across all @Controllers -->
 <mvc:annotation-driven/>
The last part, usage of Titles. this bean configuration shows where the layouts.xml and views.xml files are. You will need to understand Tiles
<bean class="org.springframework.web.servlet.view.UrlBasedViewResolver" id="tilesViewResolver">
        <property name="viewClass" value="org.springframework.web.servlet.view.tiles2.TilesView"/>
    </bean>
    <bean class="org.springframework.web.servlet.view.tiles2.TilesConfigurer" id="tilesConfigurer">
      <property name="definitions">
        <list>
          <value>/WEB-INF/layouts/layouts.xml</value>
          <!-- Scan views directory for Tiles configurations -->
          <value>/WEB-INF/views/**/views.xml</value>
        </list>
      </property>
    </bean>
The layout.xml class defines some basic arrangements of the pages that we can reuse. Tiles 'composes' pages from smaller parts based on these definition files.
<?xml version="1.0" encoding="UTF-8"?>
<!DOCTYPE tiles-definitions PUBLIC
       "-//Apache Software Foundation//DTD Tiles Configuration 2.1//EN"
       "http://tiles.apache.org/dtds/tiles-config_2_1.dtd">

<tiles-definitions>

  <definition name="default" template="/WEB-INF/layouts/default.jspx">
    <put-attribute name="header" value="/WEB-INF/views/header.jspx" />
    <put-attribute name="menu" value="/WEB-INF/views/menu.jspx" />
    <put-attribute name="footer" value="/WEB-INF/views/footer.jspx" />
  </definition>

  <definition name="public" template="/WEB-INF/layouts/default.jspx">
    <put-attribute name="header" value="/WEB-INF/views/header.jspx" />
    <put-attribute name="footer" value="/WEB-INF/views/footer.jspx" />
  </definition>

</tiles-definitions>
And the views.xml file contains configurations of specific pages. when spring navigates to a page, the view resolver translates the view names found here into tiles configurations, which then allow tiles to render the final page by assembling the pieces together. Notice the view definitions 'extend' the definitions in layouts.xml. Layouts.xml reference the exact layout jspx pages and standard parts (header, menu, footer) that are reusable. The view definition supplies the body that is unique to the view. Initially only standard 'error' pages are configured. The next command will add specific pages generated based on analyzing the domain classes we have created in Roo.
<?xml version="1.0" encoding="UTF-8"?>
<!DOCTYPE tiles-definitions PUBLIC
 "-//Apache Software Foundation//DTD Tiles Configuration 2.1//EN"
 "http://tiles.apache.org/dtds/tiles-config_2_1.dtd">

<tiles-definitions>

  <definition name="index" extends="default">
    <put-attribute name="body" value="/WEB-INF/views/index.jspx" />
  </definition>

  <definition name="dataAccessFailure" extends="public">
    <put-attribute name="body" value="/WEB-INF/views/dataAccessFailure.jspx" />
  </definition>

  <definition name="resourceNotFound" extends="public">
    <put-attribute name="body" value="/WEB-INF/views/resourceNotFound.jspx" />
  </definition>

  <definition name="uncaughtException" extends="public">
    <put-attribute name="body" value="/WEB-INF/views/uncaughtException.jspx" />
  </definition>

</tiles-definitions>
Step 2 - create the scaffold pages for our classes
- web mvc all --package ~.web
This also does a lot of code generation.
Here is what Roo responded with:
Created SRC_MAIN_JAVA\com\springsource\roo\pizzashop\web
Created SRC_MAIN_JAVA\com\springsource\roo\pizzashop\web\BaseController.java
Created SRC_MAIN_JAVA\com\springsource\roo\pizzashop\web\PizzaOrderController.java
Created SRC_MAIN_JAVA\com\springsource\roo\pizzashop\web\ToppingController.java
Created SRC_MAIN_JAVA\com\springsource\roo\pizzashop\web\PizzaController.java
Created SRC_MAIN_JAVA\com\springsource\roo\pizzashop\web\ApplicationConversionServiceFactoryBean.java
Created SRC_MAIN_WEBAPP\WEB-INF\views\toppings
Created SRC_MAIN_WEBAPP\WEB-INF\views\toppings\views.xml
Updated SRC_MAIN_WEBAPP\WEB-INF\views\toppings\views.xml
Created SRC_MAIN_WEBAPP\WEB-INF\views\menu.jspx
Created SRC_MAIN_WEBAPP\WEB-INF\tags\menu\menu.tagx
Created SRC_MAIN_WEBAPP\WEB-INF\tags\menu\item.tagx
Created SRC_MAIN_WEBAPP\WEB-INF\tags\menu\category.tagx
Updated SRC_MAIN_WEBAPP\WEB-INF\views\menu.jspx
Updated SRC_MAIN_WEBAPP\WEB-INF\views\toppings\views.xml
Updated SRC_MAIN_WEBAPP\WEB-INF\views\menu.jspx
Updated SRC_MAIN_WEBAPP\WEB-INF\i18n\application.properties
Created SRC_MAIN_WEBAPP\WEB-INF\views\bases
Created SRC_MAIN_WEBAPP\WEB-INF\views\bases\views.xml
Updated SRC_MAIN_WEBAPP\WEB-INF\views\bases\views.xml
Updated SRC_MAIN_WEBAPP\WEB-INF\views\menu.jspx
Updated SRC_MAIN_WEBAPP\WEB-INF\views\bases\views.xml
Updated SRC_MAIN_WEBAPP\WEB-INF\views\menu.jspx
Updated SRC_MAIN_WEBAPP\WEB-INF\i18n\application.properties
Created SRC_MAIN_WEBAPP\WEB-INF\views\pizzas
Created SRC_MAIN_WEBAPP\WEB-INF\views\pizzas\views.xml
Updated SRC_MAIN_WEBAPP\WEB-INF\views\pizzas\views.xml
Updated SRC_MAIN_WEBAPP\WEB-INF\views\menu.jspx
Updated SRC_MAIN_WEBAPP\WEB-INF\views\pizzas\views.xml
Updated SRC_MAIN_WEBAPP\WEB-INF\views\menu.jspx
Updated SRC_MAIN_WEBAPP\WEB-INF\i18n\application.properties
Created SRC_MAIN_WEBAPP\WEB-INF\views\pizzaorders
Created SRC_MAIN_WEBAPP\WEB-INF\views\pizzaorders\views.xml
Updated SRC_MAIN_WEBAPP\WEB-INF\views\pizzaorders\views.xml
Updated SRC_MAIN_WEBAPP\WEB-INF\views\menu.jspx
Updated SRC_MAIN_WEBAPP\WEB-INF\views\pizzaorders\views.xml
Updated SRC_MAIN_WEBAPP\WEB-INF\views\menu.jspx
Updated SRC_MAIN_WEBAPP\WEB-INF\i18n\application.properties
Updated SRC_MAIN_WEBAPP\WEB-INF\spring\webmvc-config.xml
Created SRC_MAIN_JAVA\com\springsource\roo\pizzashop\web\ApplicationConversionServiceFactoryBean_Roo_ConversionService.aj
Created SRC_MAIN_JAVA\com\springsource\roo\pizzashop\web\ToppingController_Roo_Controller.aj
Created SRC_MAIN_WEBAPP\WEB-INF\views\toppings\list.jspx
Created SRC_MAIN_WEBAPP\WEB-INF\views\toppings\show.jspx
Created SRC_MAIN_WEBAPP\WEB-INF\views\toppings\create.jspx
Created SRC_MAIN_WEBAPP\WEB-INF\views\toppings\update.jspx
Created SRC_MAIN_JAVA\com\springsource\roo\pizzashop\web\BaseController_Roo_Controller.aj
Created SRC_MAIN_WEBAPP\WEB-INF\views\bases\list.jspx
Created SRC_MAIN_WEBAPP\WEB-INF\views\bases\show.jspx
Created SRC_MAIN_WEBAPP\WEB-INF\views\bases\create.jspx
Created SRC_MAIN_WEBAPP\WEB-INF\views\bases\update.jspx
Created SRC_MAIN_JAVA\com\springsource\roo\pizzashop\web\PizzaController_Roo_Controller.aj
Created SRC_MAIN_WEBAPP\WEB-INF\views\pizzas\list.jspx
Created SRC_MAIN_WEBAPP\WEB-INF\views\pizzas\show.jspx
Created SRC_MAIN_WEBAPP\WEB-INF\views\pizzas\create.jspx
Created SRC_MAIN_WEBAPP\WEB-INF\views\pizzas\update.jspx
Created SRC_MAIN_JAVA\com\springsource\roo\pizzashop\web\PizzaOrderController_Roo_Controller.aj
Created SRC_MAIN_WEBAPP\WEB-INF\views\pizzaorders\list.jspx
Created SRC_MAIN_WEBAPP\WEB-INF\views\pizzaorders\show.jspx
Created SRC_MAIN_WEBAPP\WEB-INF\views\pizzaorders\create.jspx
Created SRC_MAIN_WEBAPP\WEB-INF\views\pizzaorders\update.jspx
Looking at this output we can see that there is some repition. For each main domain class (Toppping, Bse, Pizza and PizzaOrder) we generate a controller and four jspx pages (views) list.jspx, show.jspx, create.jspx and update.jspx tied together in a menu system (menu.jspx). For tiles, each has its own views.xml file to show what layout is used.
Lets look at a couple of parts. Here is the controllers it created for Pizza:
File: ~.web.PizzaController.java
This looks pretty simple. From spring mvc the @Controller annoation marks this as a controller for the dispatcher to find. The @RequestMapping annotation indicates how to find this controller based on the request uri. The @RooWebScaffold annotation is the secret sauce that supports the Roo generated scaffold application, allowing for CRUD based functionality with List and Form views.
In fact, the annotations leverage several aspects that inject a lot of behavior here. STS can show you these using the Cross references panel to the right of the code (typically)

We can see here, that the aspects inject methods like:
Each one of these methods is very useful and relatively generic. Because roo generates this aspect j inter type generation ITD file (see spring roo architecture page) which will add these neumerous methods to your controller separating the maintenance of your customization of you particular controller class from this standardized template like methods.
For real applications, to customize behavior, we need to understand what is injected in the ITD.
Generated PizzaController_Roo_Controller.aj
Step 3 - Run the Application on the Web Server
Right click the application 'pizza' and choose Run... > Run on server. This will open the run on server dialog.

Select the default app server. STS already configures the VMWare vFabric server which will work for us for the spring mvc. For GWT eventually we will choose other options (see next articles).
Press Next and make sure the pizza application is deployed (moved from Available to Configured)
And press 'Finish'

Now the application is deployed and stared. STS will try and start this in its own default browser, which wont really run it well (unless configured otherwise). So mke sure to open your favorite browser (aka Chrome) and see the results from the url
http://localhost:8080/pizza/
Lets look at a couple of parts. Here is the controllers it created for Pizza:
File: ~.web.PizzaController.java
package com.springsource.roo.pizzashop.web;

import com.springsource.roo.pizzashop.domain.Pizza;
import org.springframework.roo.addon.web.mvc.controller.RooWebScaffold;
import org.springframework.stereotype.Controller;
import org.springframework.web.bind.annotation.RequestMapping;

@RooWebScaffold(path = "pizzas", formBackingObject = Pizza.class)
@RequestMapping("/pizzas")
@Controller
public class PizzaController {
}
This looks pretty simple. From spring mvc the @Controller annoation marks this as a controller for the dispatcher to find. The @RequestMapping annotation indicates how to find this controller based on the request uri. The @RooWebScaffold annotation is the secret sauce that supports the Roo generated scaffold application, allowing for CRUD based functionality with List and Form views.
In fact, the annotations leverage several aspects that inject a lot of behavior here. STS can show you these using the Cross references panel to the right of the code (typically)

We can see here, that the aspects inject methods like:
- create
- createForm
- delete
- encode
- list
- populateBases (many-one relationship)
- populatePizzas (for lists)
- populateToppings (many-many relationship)
Each one of these methods is very useful and relatively generic. Because roo generates this aspect j inter type generation ITD file (see spring roo architecture page) which will add these neumerous methods to your controller separating the maintenance of your customization of you particular controller class from this standardized template like methods.
For real applications, to customize behavior, we need to understand what is injected in the ITD.
Generated PizzaController_Roo_Controller.aj
// WARNING: DO NOT EDIT THIS FILE. THIS FILE IS MANAGED BY SPRING ROO.
// You may push code into the target .java compilation unit if you wish to edit any member(s).
package com.springsource.roo.pizzashop.web;
import com.springsource.roo.pizzashop.domain.Base;
import com.springsource.roo.pizzashop.domain.Pizza;
import com.springsource.roo.pizzashop.domain.Topping;
import java.io.UnsupportedEncodingException;
import java.lang.Integer;
import java.lang.Long;
import java.lang.String;
import java.util.Collection;
import javax.servlet.http.HttpServletRequest;
import javax.validation.Valid;
import org.springframework.ui.Model;
import org.springframework.validation.BindingResult;
import org.springframework.web.bind.annotation.ModelAttribute;
import org.springframework.web.bind.annotation.PathVariable;
import org.springframework.web.bind.annotation.RequestMapping;
import org.springframework.web.bind.annotation.RequestMethod;
import org.springframework.web.bind.annotation.RequestParam;
import org.springframework.web.util.UriUtils;
import org.springframework.web.util.WebUtils;
privileged aspect PizzaController_Roo_Controller {
@RequestMapping(method = RequestMethod.POST)
public String PizzaController.create(@Valid Pizza pizza, BindingResult bindingResult, Model uiModel, HttpServletRequest httpServletRequest) {
if (bindingResult.hasErrors()) {
uiModel.addAttribute("pizza", pizza);
return "pizzas/create";
}
uiModel.asMap().clear();
pizza.persist();
return "redirect:/pizzas/" + encodeUrlPathSegment(pizza.getId().toString(), httpServletRequest);
}
@RequestMapping(params = "form", method = RequestMethod.GET)
public String PizzaController.createForm(Model uiModel) {
uiModel.addAttribute("pizza", new Pizza());
return "pizzas/create";
}
@RequestMapping(value = "/{id}", method = RequestMethod.GET)
public String PizzaController.show(@PathVariable("id") Long id, Model uiModel) {
uiModel.addAttribute("pizza", Pizza.findPizza(id));
uiModel.addAttribute("itemId", id);
return "pizzas/show";
}
@RequestMapping(method = RequestMethod.GET)
public String PizzaController.list(@RequestParam(value = "page", required = false) Integer page, @RequestParam(value = "size", required = false) Integer size, Model uiModel) {
if (page != null || size != null) {
int sizeNo = size == null ? 10 : size.intValue();
uiModel.addAttribute("pizzas", Pizza.findPizzaEntries(page == null ? 0 : (page.intValue() - 1) * sizeNo, sizeNo));
float nrOfPages = (float) Pizza.countPizzas() / sizeNo;
uiModel.addAttribute("maxPages", (int) ((nrOfPages > (int) nrOfPages || nrOfPages == 0.0) ? nrOfPages + 1 : nrOfPages));
} else {
uiModel.addAttribute("pizzas", Pizza.findAllPizzas());
}
return "pizzas/list";
}
@RequestMapping(method = RequestMethod.PUT)
public String PizzaController.update(@Valid Pizza pizza, BindingResult bindingResult, Model uiModel, HttpServletRequest httpServletRequest) {
if (bindingResult.hasErrors()) {
uiModel.addAttribute("pizza", pizza);
return "pizzas/update";
}
uiModel.asMap().clear();
pizza.merge();
return "redirect:/pizzas/" + encodeUrlPathSegment(pizza.getId().toString(), httpServletRequest);
}
@RequestMapping(value = "/{id}", params = "form", method = RequestMethod.GET)
public String PizzaController.updateForm(@PathVariable("id") Long id, Model uiModel) {
uiModel.addAttribute("pizza", Pizza.findPizza(id));
return "pizzas/update";
}
@RequestMapping(value = "/{id}", method = RequestMethod.DELETE)
public String PizzaController.delete(@PathVariable("id") Long id, @RequestParam(value = "page", required = false) Integer page, @RequestParam(value = "size", required = false) Integer size, Model uiModel) {
Pizza.findPizza(id).remove();
uiModel.asMap().clear();
uiModel.addAttribute("page", (page == null) ? "1" : page.toString());
uiModel.addAttribute("size", (size == null) ? "10" : size.toString());
return "redirect:/pizzas";
}
@ModelAttribute("bases")
public Collection PizzaController.populatePizzas() {
return Pizza.findAllPizzas();
}
@ModelAttribute("toppings")
public Collection PizzaController.populateToppings() {
return Topping.findAllToppings();
}
String PizzaController.encodeUrlPathSegment(String pathSegment, HttpServletRequest httpServletRequest) {
String enc = httpServletRequest.getCharacterEncoding();
if (enc == null) {
enc = WebUtils.DEFAULT_CHARACTER_ENCODING;
}
try {
pathSegment = UriUtils.encodePathSegment(pathSegment, enc);
}
catch (UnsupportedEncodingException uee) {}
return pathSegment;
}
}
Step 3 - Run the Application on the Web Server
Right click the application 'pizza' and choose Run... > Run on server. This will open the run on server dialog.

Press Next and make sure the pizza application is deployed (moved from Available to Configured)
And press 'Finish'

Now the application is deployed and stared. STS will try and start this in its own default browser, which wont really run it well (unless configured otherwise). So mke sure to open your favorite browser (aka Chrome) and see the results from the url
http://localhost:8080/pizza/
When started you should see:


Notice that tiles has assembled this page by bringing together a standard header, and a menu. The content area changes depending on what is selected.
The menu shows each domain class with two actions: Create new and List all . You can experiment with this scaffold application, create stuff etc. Notice how it handles the relationships from Pizza to Topping, or Pizza to Base. Or how PizzaOrders works.
This is not a deliverable application by far, but it will demonstrate your model. The technology configuration that it uses has a lot of assumptions on the tag @RooWebScaffold annotation to make it all work for actions like:
The scaffold also uses custom tags to handle these forms and expose this functionality.
You can customize what it generates incrementally to move closer to your application.
Opinion
But real customization to the desired application design is hard if you start with a web site design in mind and try to map it to the scaffold UI. For the controller, the ITD (intertype files) created add very useful standard form based behavior to your applicaitons which can be leveraged by a variety of UI approaches. But for the JSP generated, if you don't care as much and are doing an administrative application, this approach may suit you. You can compromise the UI design to best fit what has been generated and make customization's where needed. My experience is that this is rare. You can look at what is generated, but day 2 you are on your own. The basic configuration of spring mvc with tiles is good. The scaffold tags and jsps may not be what you need. You will need to really understand the annotated controllers and be able to write your own front end.
Next Steps
Next we will configure to use with GWT and see how this looks
The menu shows each domain class with two actions: Create new
This is not a deliverable application by far, but it will demonstrate your model. The technology configuration that it uses has a lot of assumptions on the tag @RooWebScaffold annotation to make it all work for actions like:
- List
- Create
- View
- Edit
- Remove
The scaffold also uses custom tags to handle these forms and expose this functionality.
You can customize what it generates incrementally to move closer to your application.
- You can modify messages
- you can modify csss
- you can play with layout (remember tiles)
- And parts of the JSP
Opinion
But real customization to the desired application design is hard if you start with a web site design in mind and try to map it to the scaffold UI. For the controller, the ITD (intertype files) created add very useful standard form based behavior to your applicaitons which can be leveraged by a variety of UI approaches. But for the JSP generated, if you don't care as much and are doing an administrative application, this approach may suit you. You can compromise the UI design to best fit what has been generated and make customization's where needed. My experience is that this is rare. You can look at what is generated, but day 2 you are on your own. The basic configuration of spring mvc with tiles is good. The scaffold tags and jsps may not be what you need. You will need to really understand the annotated controllers and be able to write your own front end.
Next Steps
Next we will configure to use with GWT and see how this looks