Friday, October 31, 2008

Learning Surf 5 - Opening a content editor

In this blog entry, I will build on the tutorial in my last blog entry where I added a new button to the toolbar of the Document Library section of the Share application. When we click on this 'create' button, a dialog box should open (light box) with a form to create a new content item. When we press 'ok', a new content item should be created with the given name in the current folder.

Step 1 - Create a form webscript

My model example will be the document library 'create folder' web script in Share. This ui webscript contains a form to create a new folder. It is opened from clicking the 'New Folder' button on the Document Library section of Share. This function opens a form in a popup dialog like I want.

To create the web script ui form template, I will start by copying the create-folder.get.*.* webscript files from $SLINGSHOT_SRC_DIR/config/alfresco/site-webscripts/org/alfresco/modules/documentlibrary to $SLINGSHOT_SRC_DIR/config/alfresco/site-webscripts/org/alfresco/components/documentlibrary and rename them to 'create-content.get.*.*'. This creates three files:
  • create-content.get.desc.xml,
  • create-content.get.html.ftl
  • create-content.get.properties
Inside of create-content.get.desc.xml, we need to change the URI of the webscript to /components/documentlibrary/create-content and its description. create-content.get.desc.xml should now read:

<webscript>
<shortname>content-createform</shortname>
<description>Displays a form to create html content</description>
<url>/components/documentlibrary/create-content</url>
</webscript>


Now we have a new ui webscript component 'create-content' that we can call within a dialog that will render a form. The form contains labels for creating a folder so we can modify the create-content.get.properties with custom messages for this dialog:

## Titles
title=Create Content
header=New Content Details

## Labels
label.name=Name
label.title=Title
label.description=Description
Step 2 - Registering the new Web Script

Since we have created a new ui web script at /components/documentlibrary/create-content we need to register it. We simply go to 'http://localhost:8080/share/service/index' and click the 'refresh web scripts' button. This will scan for new web scripts. See the web scripts hello world quick start wiki page for more details. This page also shows a count of the total web scripts registered. We should see this increase by one. To verify the webscript is registered, we can click 'Browse by Web Script UI' and find our new component at '/components/documentlibrary/create-content'. Clicking on our uri, we see a details page describing the component. This information is taken from the 'create-content.get.desc.xml' file.

To test our new component, we can enter its url: 'http://localhost:8080/share/service/components/documentlibrary/create-content'. This will error in the web script because it requires the htmlid parameter to exist. If we enter 'http://localhost:8080/share/service/components/documentlibrary/create-content?htmlid' this will satisfy the requirement and the form should render.

Step 3 - Opening the form in a dialog

In my previous blog entry, we added a button to the toolbar of the Document Library named 'Create' which currently opens a popup message saying feature is not implemented. We will modify the 'Create' button behavior on Document Library toolbar to open this new create-content form in a dialog. In the previous blog, we created the onFileCreate action handler function of $SLINGSHOT_SRC_DIR/source/web/components/documentlibrary/toolbar.js to open a simple popup indicating the feature was not created yet. We will change this behavior by looking at the 'onFolderCreate' function as an example of opening a template in a dialog.

We will copy the body of DLTB_onFolderCreate into the body of DLTB_onFileCreate and change the line

templateUrl: Alfresco.constants.URL_SERVICECONTEXT + "modules/documentlibrary/create-folder",
To read
templateUrl: Alfresco.constants.URL_SERVICECONTEXT + "components/documentlibrary/create-content",
Where the final function should read:
  onFileCreate: function DLTB_onFileCreate(e, p_obj)
{
var actionUrl = YAHOO.lang.substitute(Alfresco.constants.PROXY_URI + "slingshot/doclib/action/folder/site/{site}/{container}/{path}",
{
site: this.options.siteId,
container: this.options.containerId,
path: this.currentPath
});

var doSetupFormsValidation = function DLTB_oNF_doSetupFormsValidation(p_form)
{
// Validation
// Name: mandatory value
p_form.addValidation(this.id + "-createFolder-name", Alfresco.forms.validation.mandatory, null, "keyup");
// Name: valid filename
p_form.addValidation(this.id + "-createFolder-name", Alfresco.forms.validation.nodeName, null, "keyup");
p_form.setShowSubmitStateDynamically(true, false);
};

if (!this.modules.createFolder)
{
this.modules.createFolder = new Alfresco.module.SimpleDialog(this.id + "-createFolder").setOptions(
{
width: "30em",
// templateUrl: Alfresco.constants.URL_SERVICECONTEXT + "modules/documentlibrary/create-folder",
templateUrl: Alfresco.constants.URL_SERVICECONTEXT + "components/documentlibrary/create-content",
actionUrl: actionUrl,
doSetupFormsValidation:
{
fn: doSetupFormsValidation,
scope: this
},
firstFocus: this.id + "-createFolder-name",
onSuccess:
{
fn: function DLTB_onNewFolder_callback(response)
{
var folder = response.json.results[0];
YAHOO.Bubbling.fire("folderCreated",
{
name: folder.name,
parentPath: folder.parentPath,
nodeRef: folder.nodeRef
});
Alfresco.util.PopupManager.displayMessage(
{
text: this._msg("message.new-folder.success", folder.name)
});
},
scope: this
}
});
}
else
{
this.modules.createFolder.setOptions(
{
actionUrl: actionUrl,
clearForm: true
});
}
this.modules.createFolder.show();
},


A lot more needs to be done. But at this point we should test our code.
To build and deploy, I use ant 'incremental-slinghot-tomcat' which should create the share.war and deploy to $APP_TOMCAT_HOME.

Clicking on the 'Create' button of Document Library, this is what we should now see:


Currently, this web script dialog should create a folder, not a content item that we want. We will modify this in the next step.

Step 4 - Modifying the Create Content dialog to accept content

In the dialog we are creating, some things to notice about the construction of the Alfresco.SimpleDialog object in our 'onCreateContent action handler function:
  • The 'actionURI' defined at the beginning of the function will be used to invoke the RESTful service on the content repository. Currently this is pointing to the create folder function, but we will change this to create new content.
  • There are two validators added 'manditory' and 'nodeName' to the name field of the createContent form. We will keep this behavior.
There is actually no 'content' entered for the new content. In creating a new folder, only the metadata 'name', 'title' and 'description' are needed. To create new content, we would also like to add the actual content. We will do this initially as plain text. Later, we will try to use a WYSIWYG editor.

To add the 'content' section, we will modify 'create-content.get.html.ftl' and add the following section:

         <div class="yui-gd">
<div class="yui-u first"><label for="${args.htmlid}-content">${msg("label.content")}:</label></div>
<div class="yui-u"><textarea id="${args.htmlid}-content" name="content" rows="3" cols="20" tabindex="3" ></textarea></div>
</div>


Here we have added a new div section to contain a textarea html form element with the name '-content'. This text area will allow us to enter plain text to supply content to our new document. Later we will modify this to use the yui html editor. The complete 'create-content.get.html.ftl' template should look like the following:

<div id="${args.htmlid}-dialog" class="create-folder">
<div class="hd">${msg("title")}</div>
<div class="bd">
<form id="${args.htmlid}-form" action="" method="post">
<div class="yui-g">
<h2>${msg("header")}:</h2>
</div>
<div class="yui-gd">
<div class="yui-u first"><label for="${args.htmlid}-name">${msg("label.name")}:</label></div>
<div class="yui-u"><input id="${args.htmlid}-name" type="text" name="name" tabindex="1" />&nbsp;*</div>
</div>
<div class="yui-gd">
<div class="yui-u first"><label for="${args.htmlid}-title">${msg("label.title")}:</label></div>
<div class="yui-u"><input id="${args.htmlid}-title" type="text" name="title" tabindex="2" /></div>
</div>
<div class="yui-gd">
<div class="yui-u first"><label for="${args.htmlid}-description">${msg("label.description")}:</label></div>
<div class="yui-u"><textarea id="${args.htmlid}-description" name="description" rows="3" cols="20" tabindex="3" ></textarea></div>
</div>
<div class="yui-gd">
<div class="yui-u first"><label for="${args.htmlid}-content">${msg("label.content")}:</label></div>
<div class="yui-u"><textarea id="${args.htmlid}-content" name="content" rows="3" cols="20" tabindex="3" ></textarea></div>
</div>
<div class="bdft">
<input type="button" id="${args.htmlid}-ok" value="${msg("button.ok")}" tabindex="4" />
<input type="button" id="${args.htmlid}-cancel" value="${msg("button.cancel")}" tabindex="5" />
</div>
</form>
</div>
</div>
You may also have noticed that we added a new label 'content', so we will have to update our create-content.get.properties file to include it.
label.content=content
Now that our form has the new '-content' field, we can extract content entered from it, and use it to pass to a remote webscript to create this content. To accomplish the creation of a new file, we need to create a new service. This will be the subject of my next blog entry.

Thursday, October 30, 2008

Learning Surf 4 - Modifying Share documentLibrary with Create Content button


This and the next blog entries will walk through the process of adding a new button to the documentLibrary section of Share which will allow the creation of new content using an in-line WYSIWYG editor.

This blog will add a 'Create' button to the toolbar of the Document Library module and open a popup when clicked showing a message 'feature not implemented yet'

Step 1 - mapping the terrain

As I have done in previous blog entries, I will draw a picture of the dependent files (xml, freemarker and javascript) that renders the relevant portion of the document library, and indicate what needs to be modified.


As shown before, the key files are:
  • 'site-data/pages/documentLibrary.xml' page references 'documentLibrary.xml' template-instance
  • 'site-data/template-instances/documentLibrary.xml' contains reference to 'org/alfresco/documentLibrary' template type
  • 'templates/org/alfresco/documentLibrary.ftl' contains the structure of the page with regions containing components including the 'toolbar' region
  • 'site-data/components/template.toolbar.documentLibrary.xml' defines the component to fit in region 'toolbar' of template 'documentLibrary' refrencing a webscript ui component registered to the url '/components/documentlibrary/toolbar'
  • site-webscripts/org/alfresco/components/documentlibrary/toolbar.get.desc.xml' describes the ui webscript registered to the '/components/library/toolbar' url, it includes freemarker renderers 'toolbar.get.head.ftl' and 'toolbar.get.html.ftl'.
  • 'toolbar.get.head.ftl' references toolbar.js and toolbar.css found in 'web/components/documentlibrary/' source folder.
Step 2 - Add the button to the template

The 'toolbar' component contains the space for the 'create' button I wish to add. Within the 'toolbar.get.html.ftl' I have added a couple of lines for the new button:

 <div class="new-folder hideable DocListTree"><button id="${args.htmlid}-newFolder-button" name="newFolder">${msg("button.new-folder")}</button></div>

<!-- Added by EEW 20081030 -->
<div class="separator hideable DocListTree">&nbsp;</div>
<div class="file-create hideable DocListTree"><button id="${args.htmlid}-fileCreate-button" name="fileCreate">${msg("button.create")}</button></div>
<!-- End Added -->

<div class="separator hideable DocListTree">&nbsp;</div>
<div class="file-upload hideable DocListTree"><button id="${args.htmlid}-fileUpload-button" name="fileUpload">${msg("button.upload")}</button></div>


Step 3 - Add Messages for the button

This code also changes the 'toolbar.get.properties' file adding the key/value 'button.create=Create',


Step 4 - Add CSS Entries and Images for the button

 and the toolbar.css used to render the button:


/* added by EEW 20081030 */

.toolbar .file-create button
{
background: transparent url(images/create-16.png) no-repeat 12px 4px;
padding-left: 32px;
}
.toolbar .file-create .yui-button-disabled button
{
background-image: url(images/create-disabled-16.png);
}

/* done added */


As implied by the css above, I have also created two new images to appear with the button: create-16.png and create-disabled-16.png. For testing purposes, I simply copied edit-blog-16.png.

Step 5 - Add the Button as a YUI Button

In 'toolbar.js', I have added a line to instantiate the YUI button named in the toolbar template in the 'onReady' YUI event listener

   
// added by EEW 20081030

// File Create button: user needs "create" access
this.widgets.fileCreate = Alfresco.util.createYUIButton(this, "fileCreate-button", this.onFileCreate,
{
disabled: true,
value: "create"
});
// done added

// File Upload button: user needs "create" access
this.widgets.fileUpload = Alfresco.util.createYUIButton(this, "fileUpload-button", this.onFileUpload,
{
disabled: true,
value: "create"
});


In this code, we see that the YUI button ties the name 'fileCreate-button' (which is the id in the button tag defined in 'toolbar.get.html.ftl'), and the event name 'onFileCreate', which will fire when the button is clicked. 

Step 6 - Add the Event Code

The event is also defined in toolbar.js:

      /**
* File Create click handler
*
* @method onFileCreate
* @param e {object} DomEvent
* @param p_obj {object} Object passed back from addListener method
*/
onFileCreate: function DLTB_onFileCreate(e, p_obj)
{
/*
var url = YAHOO.lang.substitute(Alfresco.constants.URL_CONTEXT + "page/site/{site}/blog-postedit?container={container}",
{
site: this.options.siteId,
container: this.options.containerId
});
window.location = url;
Event.preventDefault(e);
*/
var notimpTitle = this._msg("title.notimp");
var notimpMsg = this._msg("message.notimp", "Create Content");

Alfresco.util.PopupManager.displayPrompt(
{
title: notimpTitle,
text: Alfresco.util.decodeHTML(notimpMsg),
noEscape: true,
modal: true,
buttons: [
{
text: this._msg("button.cancel"),
handler: function DLTB_onActionDelete_cancel()
{
this.destroy();
}
}]
});

},


This event handler will open a popup message for now showing that this feature is not yet implemented.

Step 7 - Add The Messages for the Popup Message Box

At this point I am only defining a placeholder for this event. In order to support the above popup, I have included the message keys to 'toolbar.get.properties':

## Added by EEW 20081031

button.create=Create
title.notimp=Not Implemented
message.notimp = Feature {0} is not implemented yet.

## Done Added


Step 8 - Build, Deploy and Test

To test, I use ant task 'incremental-slingshot-tomcat' to build and deploy my changes to tomat. As a remider, the ant task requires environment variables TOMCAT_HOME and APP_TOMCAT_HOME to be defined to the installed tomcat.

And you should see this:


Wednesday, October 29, 2008

Learning Surf 3 - More analysis of Slingshot (Share) - looking at Blog List

Please see my previous blog entry for more detail on general concepts of Slingshot's configuration as a Surf platform application.

In the next blogs, I will attempt enhancing Share to add a 'create' button along side of the 'upload' button in the 'document Library' section which will open an in-place WYSIWYG editor to create html based content. In preparation for this, I will look at similar code implemented to post a blog entry.

In Share (Slingshot), creating or selecting a site from the dashboard 'sites' dashlet opens the site dashboard. The top navigation provides buttons to select 'Blog' to view and enter blog entries. Selecting 'blog' creates the URL:

http://localhost:8080/share/page/site/mc/blog-postlist

One of the difficulties in getting your head around working with Surf based web applications is understanding how everything is connected together. I will attempt to show how the bloglist page is rendered.


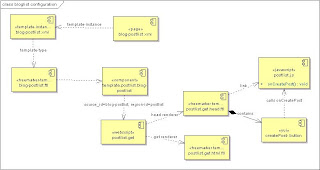
This diagram shows my map of the dependencies of the various xml, javascript and freemarker files that assemble the bloglist page.

Decomposing the url, we see the pattern /page/* which maps to the pageRendererServlet. Using the 'config/alfresco/web-framework-config-application.xml' which defines url patterns to find the /site/{site}/blog-postlist from the object model defined in xml files, found according to the search path for the types of components it is looking for (see previous blog).

'site-data/pages/blog-postlist.xml' defines a page model object for the page. It refers to a template instance blog-postlist.xml.

'site-data/template-instances/blog-postlist.xml' defines a template-instance model object which refers to the template-type found using org/alfresco/blog-postlist

'templates/org/alfresco/blog-postlist.ftl' is found as the search for template types assumes a freemarker template at the path defined if not explicitly defined see surf developer documentation. This template works in conjunction with component definitions to associate components with regions defined in the source template.

'site-data/components/template.postlist.blog-postlist.xml' provides component mapping to region 'postlist' in source id 'blog-postlist', mapping to a component found by url '/components/blog/postlist'

'site-webscripts/org/alfresco/components/blog/postlist.get.desc.xml' ui webscript is registered to the url pattern defined for the template and uses 'postlist.get.head.ftl' and 'postlist.get.html.ftl' as renderers.

'site-webscripts/org/alfresco/components/blog/postlist.get.head.ftl' links to the 'postlist.js' javascript.

'source/web/components/blog/postlist.js' among other things defines a yui button to create a blog post (createPost-button), which when pressed will call the onCreatePost action handler.

'site-webscripts/org/alfresco/components/blog/postlist.get.html.ftl' renders the Blog post list page, including the 'createPost-button' yui button. Clicking on this button calls the onCreatePost action handler defined in postlist.js' which will in tern compose the url

http://localhost:8080/share/page/site/mc/blog-postedit?container=blog

This page renders a WYSIWYG editor configured to allow creation of blog entries.

Monday, October 27, 2008

Learning Surf 2 - Examining slingshot configuration

Examining slingshot configuration

You can see my previous blog entry for a background in getting started with surf.

The Surf platform is a web script based framework for developing web 2.0 based applications that can use the alfresco content repository. It relies on the technologies of xml, freemarker and javascript. It heavily leverages alfresco's freemarker templates and the javascript api, and the alfresco's web script technologies that define ui components or RESTful services.

Surf based applications can be developed without an Alfresco content repository access, but ones that use the content repository are developed and deployed as two war files, one for the web application built on surf (i.e. share.war), and one for the content repository it accesses (alfresco.war). These war files can be deployed within the same application container (i.e. tomcat) or different application containers on the same machine or different machines. The web application communicates with the content repository over RESTful services (essentially over http).

The share application is a surf framework application. The source tree stores share in a project called 'slingshot'. Slighshot depends on other projects in the source tree, including:
  • 3rd Party
  • Core
  • Web Framework
  • Webscript Framework
Configurations of a surf application are contained in the following types of configurations:
  • war configuration files (web.xml)
  • alfresco configuration files (i.e. web-framework-config.xml and LOTS more)
  • spring bean configurations (i.e. slingshot-application-context.xml)
  • resource bundles (i.e. slingshot.properties)
This blog will look at the first three to understand how a surf application is configured.

To trace the configuration, we start with the war. Whithin the Slingshot application is a source folder which includes web/WEB-INF that contains the web.xml for the share.war.

looking at web.xml

A context-param section is included to define the contextConfigurationLocation for spring to find all of the spring beans that are needed to configure the surf application. These include:
  • classpath:alfresco/webscript-framework-application-context.xml
  • classpath:alfresco/web-framework-application-context.xml
  • classpath:alfresco/web-framework-model-context.xml
  • classpath:alfresco/slingshot-application-context.xml
This ties slingshot to depend on the Webscript Framework and the Web Framework projects.

A listener is defined with a springframework web context loader listener wihich loads the spring context form the class paths defined in the 'contextConfigurationLocation' context parameter.

Several servlets are defined

url-patternservlet nameservlet class
/logoutlogoutServletorg.alfresco.web.site.servlet.LogoutServlet
/login/*loginServletorg.alfresco.web.site.servlet.LoginServlet
/service/*apiServletorg.alfresco.web.scripts.servlet.WebScriptServlet(container=webframework.webscripts.container)
/proxy/*proxyServletorg.alfresco.web.scripts.servlet.EndPointProxyServlet
/page/*, p/*pageRendererServletorg.alfresco.web.site.servlet.DispatcherServlet
/s/*uriTemplateServletorg.alfresco.web.uri.UriTemplateServlet
/control/*frameworkControlServletorg.alfresco.web.site.servlet.FrameworkControlServlet

Finally, weblome file list includes:
  • index.jsp
  • index.html
looking at the web-framework-config alfresco configuration file

The configuration file defines
  • page-mapper
  • link-builder
  • file-system
  • format default
  • format print
  • format wap
  • persisters
  • model-type (object model) definitions
each model-type defines id, name, class, search path and default store for the following model types:
  • chrome
  • component
  • component-type
  • configuration
  • content-association
  • page
  • page-type
  • page-association
  • template-instance
  • template-type
  • theme
These model-type definitions define where to look for marshaled configurations for model objects of each type, whether to look on the remote store, local path or in the class path.

looking at spring bean application context files

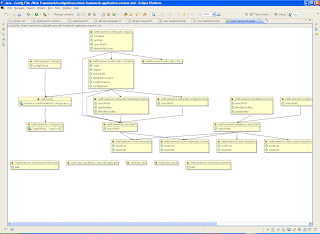
Using spring explorer in Eclipse (Ganymede) allowed me to view spring bean configuration dependencies.

The slingshot-application-context.xml references beans defined in web-framework-application-context.xml and web-framework-model-context.xml.

The web framework beans reference beans defined in webscript-framework-application-context.xml.

slingshot-application-context.xml contains the following beans:

The 'webscript.resource' bean list resource bundles that contain messages to use. The other beans (i.e.'webframework.searchpath.chrome') tell surf where to look (i.e. search paths) for definitions of the different model components that surf needs to run. For instance, to know how 'chrome' is configured.


web-framework-application-context.xml contains the following beans:


Tracing through rendering the dashboard
To demonstrate the configuration, lets look at the beginning, rendering the dashboard. The share.war defines the welcome page 'index.jsp'. This jsp redirects to '/page/site-index'. As defined in web.xml, /page/* url pattern runs the 'pageRendererServlet'. This servlet looks for a model object named 'site-index'. The name 'site-index' is defined as a page model object found in the default remote store (as defined in web-framework-config.xml for the page model-type) in './site-data/pages'.
'site-index.xml' defines a page model object named 'site-index' which defines:
  • title = welcome
  • descrition = Landing page for users - will create user site dashboard
  • template-instances = site-index
  • authentication = user
The site-index page model object references a template instance named 'site-index' found also in the default store ( ./site-data/template-instance):
The template-instance refers to a template-type 'site-index' found in (site-data/template-types)
'site-index.xml' is a template-type model object and defines:
  • title = site index landing page template type
  • description = Site index landing page JSP Template Type
  • renderer = /site-index.jsp
  • renderer-type = jsp
Looking at '/site-index.jsp' as a jsp template renderer, we see scriptlet logic that follows:
If not already created the user dashboard, create the user's dashboard using the definition in presets (found in ./site-data/presets/presets.xml) for 'user-dashboard'.
Render the user dashboard.
In 'user-dashboard' preset, the 'components' section creates components and assigns to regions according to the template insance (dashboard-3-columns) defined in the 'pages' section.

The 'dashboard-3-columns.xml' template-instance definition defines

template-type = org/alfresco/dashboard.ftl.

'dashboard.ftl' imports alfresco-template.ftl and alfresco-layout.ftl and creates regions named 'component--' where the preset components are added.

The preset creates and places the following components into the dashboard template:
define title from (site-webscripts/org/alfresco/components/title/user-dashboard-title*)
define list of page components (dashlets) positioned at {column#}-{row#):
  • user-welcome at 1-1
  • user-calendar at 1-2
  • rssfeed at 2-1
  • alfresco-network at 2-2
  • my-activities at 2-3
  • cmisfeed at 3-4
  • my-profile at 3-1
  • my-sites at 3-2
  • my-tasks at 3-3
Each dashlet is defined by a ui web-script found in site-webscripts/orgb/alfrsco/components/dashlets/. See a description of alfresco's web-scripts technology for details on ui web scripts.

Monday, October 20, 2008

Learning Surf 1 - building from source

My goal was to build the latest Alfresco from source, and begin to develop and extend it using Eclipse. I followed the instructions on: Alfresco's developer wiki . I followed the guidance of the Eclipse section to import all alfresco projects.

Unfortunately, between the first time I did this (early September) and the latest time (October 15), there was significant changes to the codebase that affected the Eclipse projects I imported earlier. I went through the pain of refreshing projects and rebuilding everything until I finally got everything to pass. It was probably better that i deleted these older projects and started with fresh imports. This is a large code base (over 500 meg compressed) so I warn you that this will take some time. Once the code base is built from source, I can follow along refreshing as needed.

Note, since I am developing on a Windows laptop (dont ask why), I used tortoise svn. This worked fairly well for me. I also got the subversion plug in for Eclipse. These two seem to work well with each other well for now.

My first step was to build the alfresco war. I had already created an alfresco database in MySQL as the wiki suggested. I also had tomcat 5.5 installed and Ant so the build was fairly painless.


ant build-tomcat


This created the alfresco.war and deployed it to TOMCAT_HOME. Make sure to set up the environment variables as described. TOMCAT_HOME will be where the alfresco.war will be deployed. APP_TOMCAT_HOME will be where share.war and alfwf.war will be deployed. These can be different or the same. Alfresco 3.0 is now truly service oriented and webapps can be developed (i.e. share.war) and deployed independently of the repository (alfresco.war). For development purposes, I set these to the same tomcat instance.

One problem my team ran into was that share.war refused to authenticate admin/admin. We later determined this was due to the fact that we were running tomcat on a different port than 8080 and there were several configuration files that needed to be changed to reflect this:


$ALF_HOME/tomcat/webapps/alfresco/wsdl/administration-service.wsdl
$ALF_HOME/tomcat/webapps/alfresco/wsdl/dictionary-service.wsdl
$ALF_HOME/tomcat/webapps/alfresco/wsdl/content-service.wsdl
$ALF_HOME/tomcat/webapps/alfresco/wsdl/authoring-service.wsdl
$ALF_HOME/tomcat/webapps/alfresco/wsdl/access-control-service.wsdl
$ALF_HOME/tomcat/webapps/alfresco/wsdl/action-service.wsdl
$ALF_HOME/tomcat/webapps/alfresco/wsdl/authentication-service.wsdl
$ALF_HOME/tomcat/webapps/alfresco/wsdl/repository-service.wsdl
$ALF_HOME/tomcat/webapps/alfresco/wsdl/classification-service.wsdl
$ALF_HOME/tomcat/webapps/share/WEB-INF/urlrewrite.xml
$ALF_HOME/tomcat/webapps/share/WEB-INF/classes/alfresco/pagerenderer-config.xml
$ALF_HOME/tomcat/webapps/share/WEB-INF/classes/alfresco/webscript-framework-config-test.xml
$ALF_HOME/tomcat/webapps/share/WEB-INF/classes/alfresco/webscript-framework-config.xml
$ALF_HOME/tomcat/webapps/share/WEB-INF/classes/alfresco/webscripts/org/alfresco/indexall.get.mediawiki.ftl


After building and deploying alfresco.war and share.war, and testing, I switched to the instructions for building and deploying the surf platform. In these instructions, the alfwf.war is built and deployed (alfwf.war) to APP_TOMCAT_HOME. This is a minimal implementation of the webframework that only brings up a test page:


http://localhost:8080/alfwf/page?p=welcome


which runs some tests and dumps some configurations.

Alfresco Surf applications are created leveraging the following technologies and we should be familiar with all of them:
At this point, the fun begins - creating templates and components to the new surf platform.

Sunday, October 12, 2008

Alfresco Community Conference in DC

Last week, I attended the Alfresco Community Conference in DC where, among other things, Alfresco's Surf platform was discussed. Alfresco is moving in a bold new technical direction: towards a Web 2.0 framework developed from the ground up, completely overtaking its current Enterprise web framework based on JSF. This is bold because most vendors incrementaly develop over thier legacy frameworks. Alfresco has chosen to radically rewrite theirs.

One of Alfresco's key competitive advantages is that it had the clarity of heindsight. Alfresco could look back at the experience of the past: including Documentum, where it's CTO John Newton was co-founder, and former engineers of Vingette, Interwoven and others. This experience has allowed them to develop a better architecture from the ground up, solving the pain of the past, in a culture steeped in risk taking and innovation. Further, its committment to the community and to open principles has allowed it to continue to lead in innovation, rather than falling behind.

Sometimes openness and innovation leads to chaos. Several potential Alfresco users have hedged thier commitment to alfresco to see what Alfresco 3.0 is all about. Its radical rearchitecture has risked alienating customer customization of its previous JSF based frameworks. It is unclear what existing customers will do with this new technology, but Alfresco has committed to continue to support its legacy JSF applications for a time.

For those of us who are just starting to develop on Alfresco, the future is wide open. My company has decided to participate as Beta customers to Alfresco Enterprise 3.0. This leads us to figuring out how we can capitalize on this new platform architecture, and how to avoid the inevitable barbs of its newness. Among other blog tracks, I will update my experiences with Alfresco Surf platform with how-to's and findings. I hope this proves useful to some.

From a Technical perspective, Alfresco has rearchitected its front end web client and services relying on Web 2.0 components from Yahoo User Interface framework. The web client talks to services via RESTful JSON enabled services typically created using Alfresco's webscript framework. Surf introduces a new component model with page and component dispatching frameworks. Web client things like Templates, Pages and Components are defined declaratively leveraging lightweight XML, like the webscript framework for declaring RESTful services on alfresco. Like services, client component behavior is developed in JavaScript and benefit from a client side alfresco object model to interact with predefined components and/or alfresco remote services.

As I learn this new framework, I will blog on each step I take. I hope this will be helpful to others also learning Surf.