This is a multi-part article. This article walks through my experiences getting started with spring's Roo framework using the Spring Tools Suite (STS). The next articles will walk through different aspects of building an application from scratch.
Also see
- Part 1 - Install and create - back end (this blog)
- Part 2 - Web MVC
- Part 3 - GWT
- Part 4 - Custom app from scratch
Part One - Getting started with Roo using STS - The Roo tutorial
Time to get started. I'm going to run through the introductory materials on building a Spring Roo application using the Roo tutorial. In the next articles I will build a custom example using Spring Roo with the Google Web Toolkit front end. I will be using the Spring Tools Suite as the IDE (based on Eclipse).
I will start by following some initial advice:
- on the Google side: here is a google code blog
- on the Spring side: here is springsource roo page and the springroo start and the Beginning with Roo: The tutorial from Spring Framework reference documentation
- another blog (gwtsts.blogspot.com) by Cengiz Öner describing this effort has multi-part instructions
Installation
What I have
- Java 6 SDK r26 from here
- Running on a Windows 7 Laptop (64 bit)
Step 1 - Install STS
Download from here and follow the simple instructions.
I installed SpringSource Tool Suite: Version: 2.9.0.RELEASE Build Id: 201203011000
Step 2 - Configure to use Google Web Toolkit and Google App Engine
After running STS, go to the dashboard and select the 'extensions' tab (bottom). Find and Check Google Plugin for Eclipse and press 'Install' (bottom left)
Restart STS and thats it (for now)
Running through the Spring Roo Tutorial
Overview of Spring Pizza Shop Demo
Lets use the Spring Framework Roo tutorial to get started.This tutorial walks us through creating a Roo project including entities controllers and the UI/scaffold. I will try to emphasise use of the STS tool as well as focusinging on using GWT as the front end. To begin with, we will follow the tutorial fairly closely.
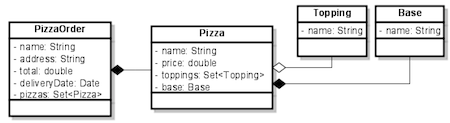
Here is the project UML from the spring tutorial that we will create
This is the Roo Pizza Shop demo
First Step Basic Roo Configuration
Spring Roo builds upon Spring framework 3.0 with JPA 2.0. It uses a command line tool to create basic elements of a project, from persistence setup, to creating entities, to creating Spring MVC controllers, to generating Scaffold ui (later we will be using GWT).
We can use spring STS to create a new spring Roo project project

- From the Dashboard, select Create a Spring Roo Project
- Fill out dialog: Project Name: pizza, top level package: com.springsource.roo.pizzashop
- Accept all other defaults and press Next (and then Finish). This will create the Roo project and open the roo shell. Actually, STS is executing the roo shell to create the project directory and the roo command:
roo> project --topLevelPackage com.springsource.roo.pizzashop
Note: Using the Roo shell in StS
Roo uses a shell similar to Rails to invoke commands that create essential structures and configurations around the Roo project. It saves a lot of time writing repetitive code or digging around to configure stuff. the shell is a bit smart in that it knows what you have done in your project and what steps can be next.

The window has a top part showing a console with roo commands as well as a prompt, but don't be fooled. The roo prompt we use in StS is below (a single line edit).
The spring ROO project leverages Maven2 and its unique project structure.
The spring ROO project leverages Maven2 and its unique project structure.
One cool roo command you will use right away is hint. This will give you possible options to do from the point in your project.
After creating a roo project, you can type HINT in the Roo shell. It will respond with:
Roo requires the installation of a JPA provider and associated database.

Type 'persistence setup' and then hit CTRL+SPACE three times.
We suggest you type 'H' then CTRL+SPACE to complete "HIBERNATE".
After the --provider, press CTRL+SPACE twice for database choices.
For testing purposes, type (or CTRL+SPACE) HYPERSONIC_IN_MEMORY.
If you press CTRL+SPACE again, you'll see there are no more options.
As such, you're ready to press ENTER to execute the command.

Once JPA is installed, type 'hint' and ENTER for the next suggestion.
It knows what you have done before so it can provide hints for the next steps. Very smart!
Next: Setup project with persistence library
As mentioned before, Spring Roo requires the configuration of a JPA provider such as Eclipselink,, OpenJPA or Hibernate.
configure persistence for this project: in Roo shell,
- As explained above, type hint and roo will prompt you to setup persistence for your project
- type' persitence setup' and press ctrl+space. In StS, this will use code assist to allow you to select possible next options for the command (the command line, you press the TAB key). In this case we will select --provider HIBERNATE and --database HYPERSONIC_IN_MEMORY
- The complete roo command is:
persistence setup --provider HIBERNATE --database HYPERSONIC_IN_MEMORY
- Roo will generate the JPA configuration files and initial spring context
Note: the roo log file
Spring keeps a log of your commands in the root project: log.roo. This may be handy to track what you have done, and in fact can be re-executed line by line to repeat your steps.
Next: Create your first Entity
In JPA, classes annotated as Entity are persistable, and generally map one-to-one to a table. Class properties generally map to columns in that table. The first class we will create will be Topping (see above UML model).
Using Roo shell:
- Type Hint again, and Roo will advise you to type ent and press TAB to get the next option (from STS, ctrl+space). This will allow us to create an entity with a specific class name: Topping
- Type entity then press (ctrl+space) . This will produce --class
- Type ~.domain.Topping for the class name (the tilda will indicate the project's package root (remember we specified com.springsource.roo.pizzashop)
- Now ctrl+space doesn't give us more hints since all required options are satisfied, but type double dash (--) and then ctrl+space will give us a bunch more options.
- type or select --testAutomatically to generate test classes for the new entity and press enter
Roo creates a whole bunch of files and aspects. Notice the actual entity "SRC_MAIN_JAVA\com\springsource\roo\pizzashop\domain\Topping.java" is created. You can see it in the packag tree. However, STS starts with an inital filter in the package tree to 'Focus on Active Task'.

Click the filter icon in the top toolbar of the Package view to reveal the entire project. Now navigate to src/main/java. See the com.springsource.roo.pizzashop.domain package and the created Topping.java class just created.
Next: Create Fields for Our Entity
Next: Create Fields for Our Entity
Now lets add a field.
Use the roo command to type:
- field string --fieldName name --notnull --sizeMin 2
This will add a field, and update/add to the generated aspects based on the annotaitions.
Opening this class, all you see is
File: Topping.java
File: Topping.java
package com.springsource.roo.pizzashop.domain;
import org.springframework.roo.addon.entity.RooEntity;
import org.springframework.roo.addon.javabean.RooJavaBean;
import org.springframework.roo.addon.tostring.RooToString;
import javax.validation.constraints.NotNull;
import javax.validation.constraints.Size;
@RooJavaBean
@RooToString
@RooEntity
public class Topping {
     @NotNull
     @Size(min = 2)
     private String name;
}
Notice the classs annotations that roo adds @RooJavaBean, @RooToString and @RooEntity. These annotations generate aspects with extensions .aj for inter type definitions. Spring also adds JSR 303 bean validation annotations on the field based on the options we specified: @NotNull and @Size(min = 2).
The principle that Roo introduces here is the heavy leveraging of AspectJ's Inter-Type Declaration (ITD). The ITD code generates as a separately complied file, but is encorporated into the class byte code of the advised class. Generally we don't need to bother about what is generated here. But lets look anyway. For instance, the @RooJavaBean annotaion creates the class Topping_Roo_JavaBean.aj. Peeking at it, we see:
File: Topping_Roo_Entity.aj
// WARNING: DO NOT EDIT THIS FILE. THIS FILE IS MANAGED BY SPRING ROO.
// You may push code into the target .java compilation unit if you wish to edit any member(s).
package com.springsource.roo.pizzashop.domain;

import java.lang.String;

privileged aspect Topping_Roo_JavaBean {
    public String Topping.getName() {
        return this.name;
    }

    public void Topping.setName(String name) {
        this.name = name;
    }
}
We see that the name field produced a getter and a setter for the field. As we add new fields, this aspect will be updated. Using aspects this way allows the domain class to remain particularly pure.
As another example, lets look at what was generated for the @RooToString annotation:
File: Topping_Roo_ToString.aj
package com.springsource.roo.pizzashop.domain;
import java.lang.String;
privileged aspect Topping_Roo_ToString {
    public String Topping.toString() {
        StringBuilder sb = new StringBuilder();
        sb.append("Id: ").append(getId()).append(", ");
        sb.append("Name: ").append(getName()).append(", ");
        sb.append("Version: ").append(getVersion());
        return sb.toString();
    }
}
Pretty nifty, huh! this is the Secret Sauce of Roo as described in Ben Alex' Blog on Roo's Architecture
Finally, lets' look at what Roo does with the @RooEntity declairation
Rather than creating a data access object (DAO) or service, Roo assumes that each entity created has its own implementation of persistence. The @RooEntity annotation generates a ITD (Inter-type Declairation) for the entity advising it to add many methods to support persistence, inclding id generation, versioning, access to the entity manager, various transactional methods:
File: Topping_Roo_Entity.aj
// WARNING: DO NOT EDIT THIS FILE. THIS FILE IS MANAGED BY SPRING ROO.
// You may push code into the target .java compilation unit if you wish to edit any member(s).

package com.springsource.roo.pizzashop.domain;

import com.springsource.roo.pizzashop.domain.Topping;
import java.lang.Integer;
import java.lang.Long;
import java.util.List;
import javax.persistence.Column;
import javax.persistence.Entity;
import javax.persistence.EntityManager;
import javax.persistence.GeneratedValue;
import javax.persistence.GenerationType;
import javax.persistence.Id;
import javax.persistence.PersistenceContext;
import javax.persistence.Version;
import org.springframework.transaction.annotation.Transactional;

privileged aspect Topping_Roo_Entity {

    declare @type: Topping: @Entity;

    @PersistenceContext
    transient EntityManager Topping.entityManager;

    @Id
    @GeneratedValue(strategy = GenerationType.AUTO)
    @Column(name = "id")
    private Long Topping.id;

    @Version
    @Column(name = "version")
    private Integer Topping.version;

    public Long Topping.getId() {
        return this.id;
    }

    public void Topping.setId(Long id) {
        this.id = id;
    }

    public Integer Topping.getVersion() {
        return this.version;
    }

    public void Topping.setVersion(Integer version) {
        this.version = version;
    }

    @Transactional
    public void Topping.persist() {
        if (this.entityManager == null) this.entityManager = entityManager();
        this.entityManager.persist(this);
    }

    @Transactional
    public void Topping.remove() {
        if (this.entityManager == null) this.entityManager = entityManager();
        if (this.entityManager.contains(this)) {
            this.entityManager.remove(this);
        } else {
            Topping attached = Topping.findTopping(this.id);
            this.entityManager.remove(attached);
        }
    }

    @Transactional
    public void Topping.flush() {
        if (this.entityManager == null) this.entityManager = entityManager();
        this.entityManager.flush();
    }

    @Transactional
    public void Topping.clear() {
        if (this.entityManager == null) this.entityManager = entityManager();
        this.entityManager.clear();
    }

    @Transactional
    public Topping Topping.merge() {
        if (this.entityManager == null) this.entityManager = entityManager();
        Topping merged = this.entityManager.merge(this);
        this.entityManager.flush();
        return merged;
    }

    public static final EntityManager Topping.entityManager() {
        EntityManager em = new Topping().entityManager;
        if (em == null) throw new IllegalStateException("Entity manager has not been injected (is the Spring Aspects JAR configured as an AJC/AJDT aspects library?)");
        return em;
    }

    public static long Topping.countToppings() {
        return entityManager().createQuery("SELECT COUNT(o) FROM Topping o", Long.class).getSingleResult();
    }

    public static List Topping.findAllToppings() {
        return entityManager().createQuery("SELECT o FROM Topping o", Topping.class).getResultList();
    }

    public static Topping Topping.findTopping(Long id) {
        if (id == null) return null;
        return entityManager().find(Topping.class, id);
    }

    public static List Topping.findToppingEntries(int firstResult, int maxResults) {
        return entityManager().createQuery("SELECT o FROM Topping o", Topping.class).setFirstResult(firstResult).setMaxResults(maxResults).getResultList();
    }

}

}
Rather than creating a data access object (DAO) or service, Roo assumes that each entity created has its own implementation of persistence. The @RooEntity annotation generates a ITD (Inter-type Declairation) for the entity advising it to add many methods to support persistence, inclding id generation, versioning, access to the entity manager, various transactional methods:
- persist,
- remove,
- flush,
- merge,
- clear
- count
- find by id
- findAll
- and pagable findAll
Next: Some More entitles and fields
Using roo shell:
Now lets create another entity and some fields similar to the ones we created before. Here are the Roo commands:
entity --class ~.domain.Base --testAutomatically
field string --fieldName name --notNull --sizeMin 2
entity --class ~.domain.Pizza --testAutomatically
field string --fieldName name --notNull --sizeMin 2
field number --fieldName price --type java.lang.Float

That's it. As long as we follow the defaults, things are easy. This is the approach taken by Ruby on Rails: convention over configuration. The command line invokes templated commands to create objects quickly.
Our project should look basically like this (as seen from the project view)
Next: Some Relationships for our Entities
We are still in JPA land. JPA allows us to create relationships as well as if POJO java classes using well known collections. Roo supports a one-to-one or many-to-one reference, a one-to-many 'set' (and also ways to create many-many). In the above, we have a one-many relationship from Pizza to Topping (a pizza has many toppings) and a one-one relationship (reference) to a base. We'll use the Roo command shell to create these too. The tutorial shows there are two relationships from Pizza, a 'reference' to a base (m:1) where a Pizza has one base, and a set of toppings (m:m relationship to toppings), where a pizza has a set of toppings.
In roo shell, type the following:
field set --fieldName toppings --type ~.domain.Topping
field reference --fieldName base --type ~.domain.Base
The above commands assume you are creating the relationship fields to the last entity you created: Pizza as it would show you in a command prompt. If not, make sure to append --class ~.domain.Pizza to the above commands (at least the first one) to assure the relationships are created for the Pizza class.
And we can finish up with PizzaOrder, in roo shell:
entity --class ~.domain.PizzaOrder --testAutomatically
field string --fieldName name --notNull --sizeMin 2
field string --fieldName address --sizeMax 30
field number --fieldName total --type java.lang.Float
field date --fieldName deliveryDate --type java.util.Date
field set --fieldName pizzas --type ~.domain.Pizza
Note: if you make a mistake, you cn press the up arrow from the Roo shell prompt in STS and previous commands can be edited and re executed.
Notice the last command creates another relationship, this time an PizzaOrder has a set of Pizzas ordered, which Roo will create a m:m relationship for of type Set pizzas. As you can see, creating entities, fields and relationships with Roo comes down to running a set of commands to generate the appropriate Java code and Aspects according to Roo convention. In fact, you can save these commands as a 'seed' text file that will create a project for you, generating the project structure, configruation, classes and aspects required.
Next: Lets Test
We can now run the integration tests using the roo command perform tests.
perform tests
Here is a summary of the roo commands executed
// Spring Roo 1.1.4.RELEASE [rev f787ce7] log opened at 2012-03-17 10:38:04
project --topLevelPackage com.springsource.roo.pizzashop --projectName pizza --java 6
// Spring Roo 1.1.4.RELEASE [rev f787ce7] log closed at 2012-03-17 10:38:15
// Spring Roo 1.1.4.RELEASE [rev f787ce7] log opened at 2012-03-17 10:38:19
hint
hint
persistence setup --database HYPERSONIC_IN_MEMORY --provider HIBERNATE
hint
entity --class ~.domain.Topping --testAutomatically
field string --fieldName name --notnull --sizeMin 2
entity --class ~.domain.Base --testAutomatically
field string --fieldName name --notNull --sizeMin 2
entity --class ~.domain.Pizza --testAutomatically
field string --fieldName name --notNull --sizeMin 2
field number --fieldName price --type java.lang.Float

field set --fieldName toppings --type ~.domain.Topping
field reference --fieldName base --type ~.domain.Base
entity --class ~.domain.PizzaOrder --testAutomatically
field string --fieldName name --notNull --sizeMin 2
field string --fieldName address --sizeMax 30
field number --fieldName total --type java.lang.Float
field date --fieldName deliveryDate --type java.util.Date

field set --fieldName pizzas --type ~.domain.Pizza
perform tests
Finally: Look at the test classes generated
The main class 'Pizza' has a name (required min size 2) and a price, but also two relationships: one a many-many relationship to Toppings class and a reference (many-one) relationship to Base class.
The main class 'Pizza' has a name (required min size 2) and a price, but also two relationships: one a many-many relationship to Toppings class and a reference (many-one) relationship to Base class.
File: Pizza.java
The class 'Base' has a single field 'name' but annotated with @NotNull and @Size min 2.package com.springsource.roo.pizzashop.domain; import org.springframework.roo.addon.entity.RooEntity; import org.springframework.roo.addon.javabean.RooJavaBean; import org.springframework.roo.addon.tostring.RooToString; import javax.validation.constraints.NotNull; import javax.validation.constraints.Size; import java.util.Set; import java.util.HashSet; import javax.persistence.ManyToMany; import javax.persistence.CascadeType; import com.springsource.roo.pizzashop.domain.Topping; import com.springsource.roo.pizzashop.domain.Base; import javax.persistence.ManyToOne; @RooJavaBean @RooToString @RooEntity public class Pizza { @NotNull @Size(min = 2) private String name; private Float price; @ManyToMany(cascade = CascadeType.ALL) private Set toppings = new HashSet (); @ManyToOne private Base base; }
File: Base.java
Topping is also a simple class, with one field 'name' declaired as Min 2 (but not NotNull ?) probably should be NotNull, dont you think?package com.springsource.roo.pizzashop.domain;
import org.springframework.roo.addon.entity.RooEntity;
import org.springframework.roo.addon.javabean.RooJavaBean;
import org.springframework.roo.addon.tostring.RooToString;
import javax.validation.constraints.NotNull;
import javax.validation.constraints.Size;
@RooJavaBean
@RooToString
@RooEntity
public class Base {
@NotNull
@Size(min = 2)
private String name;
}
File: Topping.java
Finally, PizzaOrder is the workhorse of the project. It relates the person ordering (this could be another class 'Customer' but isn't for simplicity sake (we may not need to track people or order pizza but it may help down the road)package com.springsource.roo.pizzashop.domain;
import org.springframework.roo.addon.entity.RooEntity;
import org.springframework.roo.addon.javabean.RooJavaBean;
import org.springframework.roo.addon.tostring.RooToString;
import javax.validation.constraints.Size;
@RooJavaBean
@RooToString
@RooEntity
public class Topping {
@Size(min = 2)
private String name;
}
File: PizzaOrder.java
package com.springsource.roo.pizzashop.domain;

import org.springframework.roo.addon.entity.RooEntity;
import org.springframework.roo.addon.javabean.RooJavaBean;
import org.springframework.roo.addon.tostring.RooToString;
import javax.validation.constraints.NotNull;
import javax.validation.constraints.Size;
import java.util.Date;
import javax.persistence.Temporal;
import javax.persistence.TemporalType;
import org.springframework.format.annotation.DateTimeFormat;
import java.util.Set;
import com.springsource.roo.pizzashop.domain.Pizza;
import java.util.HashSet;
import javax.persistence.ManyToMany;
import javax.persistence.CascadeType;

@RooJavaBean
@RooToString
@RooEntity
public class PizzaOrder {

    @NotNull
    @Size(min = 2)
    private String name;

    @Size(max = 30)
    private String address;

    @Temporal(TemporalType.TIMESTAMP)
    @DateTimeFormat(style = "S-")
    private Date deliveryDate;

    private Float total;

    @ManyToMany(cascade = CascadeType.ALL)
    private Set pizzas = new HashSet();
}
Fixing a problem
In the above example, i noted that Toppings 'name' field doesn't have a @NotNull annotation and it probably should. How do you fix it? Using the Roo shell is good for adding stuff, but not changing or removing stuff. To do this, just go to the java code itself.
- Open the Toppings class
- Add the @NotNull annotation
- Add the import for the annotation (I like to use CTRL+SHIFT+O for 'Organize Imports' in the Source menu)
And that's it!
Next steps
On next blog article we will add a user interface to this to complete the tutorial, still no GWT yet. That will be following.
2 comments:
Hi, thanks for the post.
Unfortunately I didn't manage to complete the project because of some problems related to maven.
I work on ubuntu 10.10, have various versions of maven 2.5, 3 installed, various versions of STS (2.5, 2.8, 3) and sun jdk 1.6....26 and didn't manage to run successfully the perform tests.
I get this message: Cannot run program "mvn" (in directory "/home/user/workspace/pizza"): java.io.IOException: error=2, No such file or directory.
I tried using various maven installations in the STS configuration, changing the environment variables JAVA_HOME and MAVEN_HOME.
No luck at all...
Any idea on how I could solve this issue?
Thanks in advance.
~.domain.PizzaOrder roo> perform tests
java.io.IOException: error=2, No such file or directory
I had a similar issue with the tools.jar location on the ten-minutes project but in this case there is not reference to the tools.jar
Tried to change the version of the roo (from 1.2.2.RELEASE [rev 7d75659]) but it was automatically (how?) changing to 1.2.2.
From the console, and the root folder of the project, I'm getting
Command 'perform tests' was found but is not currently available (type 'help' then ENTER to learn about this command)
Any idea?
Thanks
Post a Comment